How to Set Up Magento Integration
- Getting Started
- Bot Building
- Smart Agent Chat
- Conversation Design
-
Developer Guides
Code Step Integration Static Step Integration Shopify Integration SETU Integration Exotel Integration CIBIL integration Freshdesk KMS Integration PayU Integration Zendesk Guide Integration Twilio Integration Razorpay Integration LeadSquared Integration USU(Unymira) Integration Helo(VivaConnect) Integration Salesforce KMS Integration Stripe Integration PayPal Integration CleverTap Integration Fynd Integration HubSpot Integration Magento Integration WooCommerce Integration Microsoft Dynamics 365 Integration
- Deployment
- External Agent Tool Setup
- Analytics & Reporting
- Notifications
- Commerce Plus
- Troubleshooting Guides
- Release Notes
Table of Contents
Overview
Haptik’s Conversational Commerce solution helps brands running on leading e-commerce platforms implement a 24/7 AI-driven recommendation engine that serves as their end users’ personal shopping expert.
Magento 2 store owners can integrate their Haptik bot for a mesmerizing commerce journey. Below is a proper guide that can help you integrate your Magento account with Haptik.
Prerequisites for Magento Integration with Haptik
- A registered Magento Platform account
- A Haptik bot. Click here if you haven’t created one yet
Steps to Make Magento Integration Active
- Log in to your Haptik account and choose the bot you want to connect with Magento.
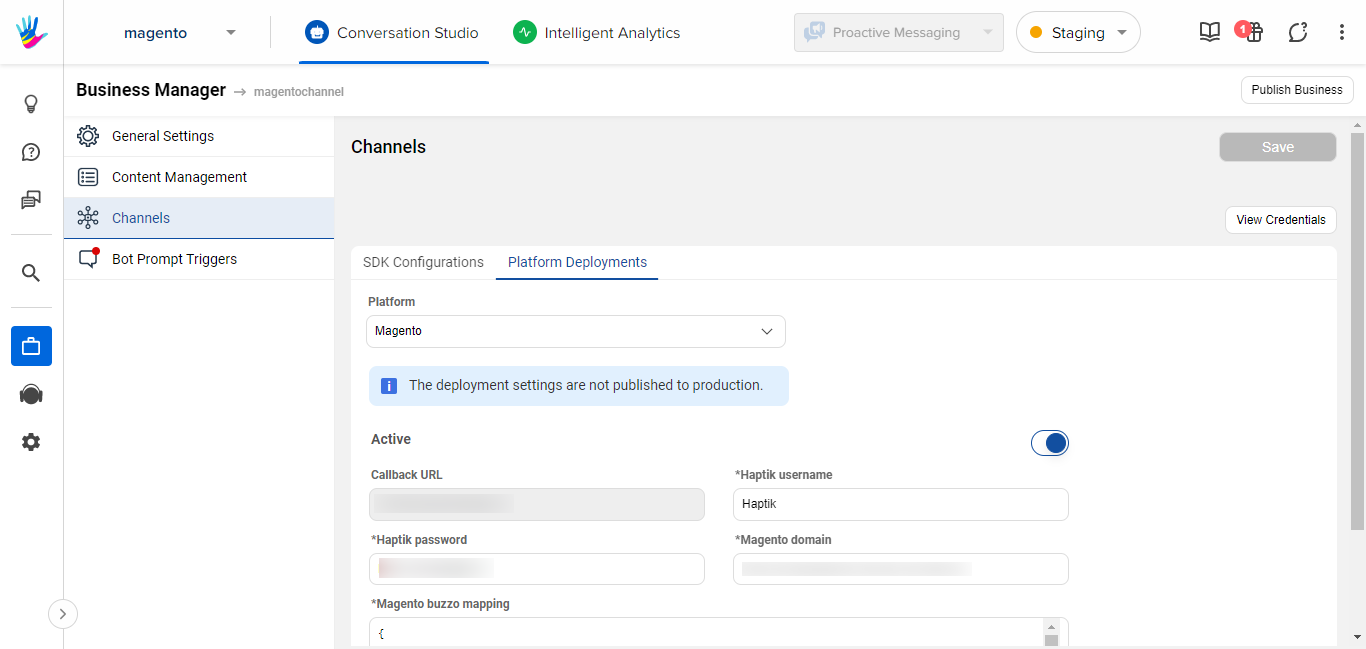
- Navigate to Conversation Studio > Business Manager > Channels > Platform Deployments and select Magento from the Platform drop-down.
- You’ll see a few blank fields that need to be filled in with the correct data. Enter your Haptik username, Haptik password, Magento domain, and Haptik <> Magento mapping as below.

Below is an example of how to fill Haptik <> Magento field mapping details. Here, every key is a Haptik field, and its value is the equivalent field from your Magento catalog. Reach out to your Haptik SPOC to get help with the same:
{
   "product_id":"sku",
   "product_group_id":"id",
   "name":"name",
   "display_name":"name",
   "haptik_category":"_category",
   "brand":"_root_category",
   "description":"description",
   "images":"image",
   "mrp":"price",
   "price":"special_price",
   "available":"status",
   "return_policy":"",
   "store_rank":"0",
   "offers":"",
   "country_of_origin":"",
   "tags":"hsn_desc",
   "features":"short_description,description,sweep_size,no_blades,power_consumption,light_kit,url_path"
}- Once everything is ready, turn on the Active toggle button.
Congrats! Your bot is integrated with your Magento 2 store now.
