How to set up bot prompt trigger?

Written by Medha Anand
Updated on August 26th, 2022
- Getting Started
- Bot Building
- Smart Agent Chat
- Conversation Design
-
Developer Guides
Code Step Integration Static Step Integration Shopify Integration SETU Integration Exotel Integration CIBIL integration Freshdesk KMS Integration PayU Integration Zendesk Guide Integration Twilio Integration Razorpay Integration LeadSquared Integration USU(Unymira) Integration Helo(VivaConnect) Integration Salesforce KMS Integration Stripe Integration PayPal Integration CleverTap Integration Fynd Integration HubSpot Integration Magento Integration WooCommerce Integration Microsoft Dynamics 365 Integration
- Deployment
- External Agent Tool Setup
- Analytics & Reporting
- Notifications
- Commerce Plus
- Troubleshooting Guides
- Release Notes
Table of Contents
Table of Contents
Bot Prompt TriggersStatic Bot Prompt Triggers1. Bot Prompt Trigger Rules2. Bot Prompt Variations:Bot Prompt using prompt()Bot Prompt Triggers
Bot prompts are pop-ups with content and click action. It’s used to grab a user’s attention in a non-intrusive way.
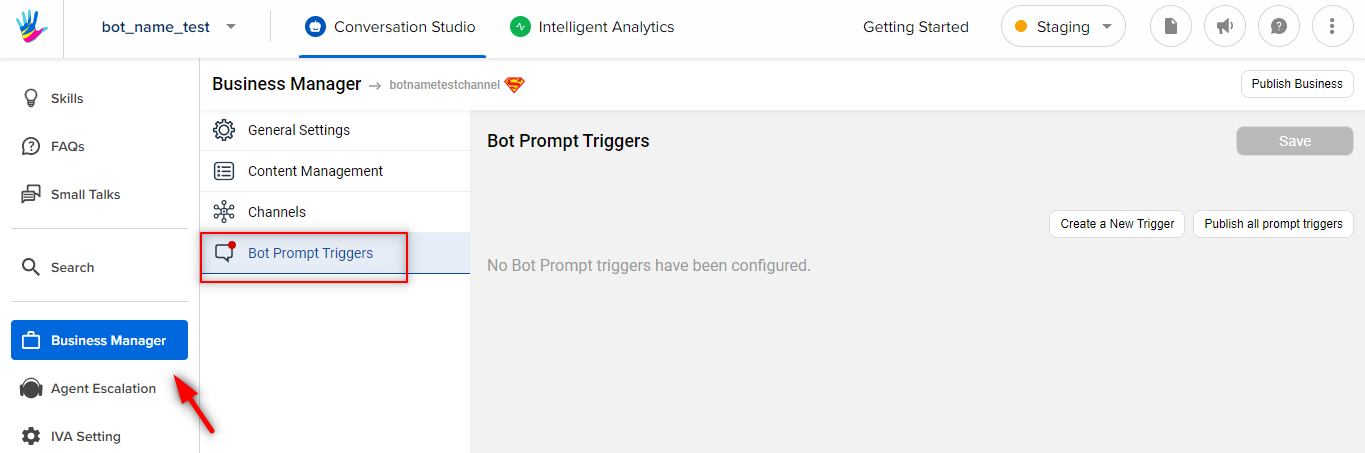
You can navigate to Bot Prompt Triggers page, as shown below -
Now, let’s go through the process to set bot prompt messages and their trigger rules.
For adding a trigger, you click on Create a New Trigger button on the top right-hand corner of this section
And then you type in the trigger message that is the text you’d want your user to read with the bot chat icon. This is for the user to get context on what can expect on interacting with the bot prompt. Since this is the first stage (initiation), testing bot prompts is crucial
You can also configure rules to your trigger, by adding URL-specific bot
prompt messages or adding on page time delay to open the particular bot prompt trigger.
Bot Prompts provide a way to allow the bot to initiate a conversation with the user. Well-designed and well-written bot prompts can drastically improve your message sending rate from users and help drive key objectives for customers.
Bot Prompts are currently available on the JS SDK only.
The Bot Prompt visual consists of the following components:
- Bot prompt title -
This is the main bot prompt text which shows up and is directed at the user. For example, "Need help picking a bot? I can guide you!". - Quick Replies (QRs) -
A bot prompt can have quick replies. These Quick Replies (QRs) serve as options the user can select right outside the XDK to get the conversation started. - User Message -
This is the actual text which is sent when a Bot prompt title or a QR is clicked.
Each element, i.e, the Bot prompt title as well as each of the QRs has a corresponding User Message configured for each of them.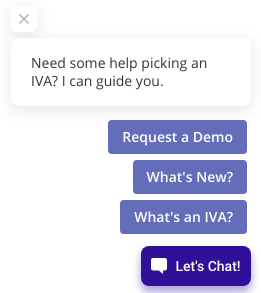
Static Bot Prompt Triggers
- For a bot prompt to be triggered appropriately, we need to set up corresponding Bot Prompt Triggers.
- Bot Prompt Triggers, as their name implies are a bunch of triggers each containing the information that specifies:
- When a bot prompt should be shown (Bot Prompt Trigger Rules).
- What information should it display (Prompt Variations).
- To add a Bot Prompt Trigger, navigate to
Conversation Studio > Business Manager > (Select Business) > Bot Prompt Triggers > Create a Trigger On clicking of
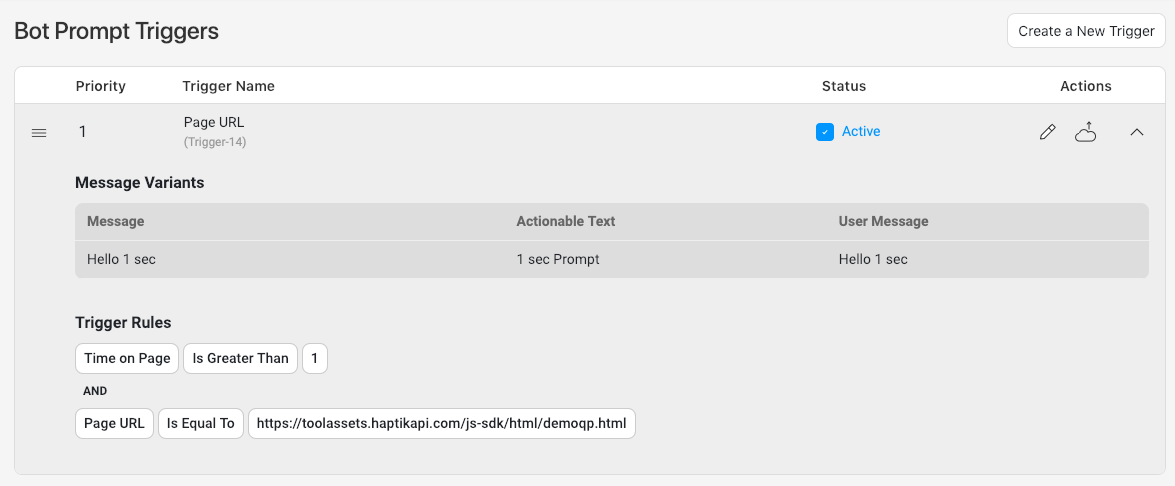
Create a Triggerbutton, you get a popup Window titledNew Trigger. In this window, you can configure the Bot Prompt Trigger Rules and Prompt Variations
1. Bot Prompt Trigger Rules
-
Bot Prompts are triggered based on a set of defined rules evaluated either on a
ANDclause or aORclause. -
Rules are set on the following parameters
- Page URL
- No. of Visits
- Query Params
- Time on Page (seconds)
- Form Field (id of the element)
-
Different types of comparisons can be done based on the type of Parameter and by using a key value pair. Here are some examples:
A trigger rule could be set like
If[Page Url] [is equal to] [https://www.haptik.ai/technology] we show our prompt.
Needless to say, the Prompt Variations for this trigger will be closely aligned to that of theTechnologypage.if
[Query Param (utm_campaign)] [is equal to] [facebook]we can welcome the users with a bot prompt that is catered to users who have navigated to this page from facebook.if
[Time on Page] [is greater than] [100]we can show a prompt which asks the user if they are stuck on anything.If
[No. of Visits] [is greater than] [1]we can use the greeting Welcome Back instead of Welcome.-
Remember that multiple such conditions can be combined using the
ANDorORclauses to create a whole host of creative options to engage the user in an intelligent manner!For example:
If{[Form Field - PAN No] [is empty]} AND {[Time on Page] [is greater than] [30 seconds]}we can ask the users if they need help finding their PAN No.
-
Adding Trigger Rules
- Click on
Add New Rule - In the
Trigger Based onthe section you can select the appropriate trigger viz. Page URL, Query Params, Time on Page, Form Field. - Then in the
Conditionsection, you can select one of the conditions that would match the requirement. Is Equal to, Is Greater than, etc. - And finally in the
Valuesection, you can add the appropriate value that fits the case as mentioned in the examples above. - The
Prompt Rules Typecontrols whether all the multiple rules would either beANDorOR.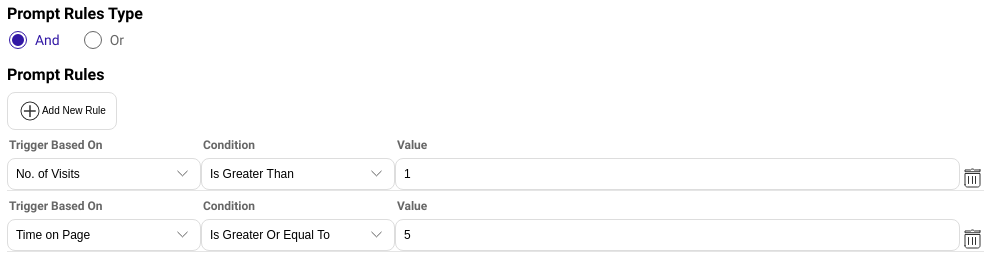
- Click on
- What if there are two Bot Prompt Triggers with the same Rules?
- When multiple bot prompts are present they are evaluated in the order of their priority. The prompt with the highest priority is evaluated first, and if the trigger conditions are met only then the prompt will be shown.
- Priority of the Bot Prompt Triggers can be adjusted by drag and drop.
2. Bot Prompt Variations:
- Bot Prompt Variations as their name implies, are a collection of different variants, where each variant specifies the Bot Prompt Title and its associated QRs (if any).
- When the Rules of a Bot Prompt Trigger are met, it is selected to be displayed. Each Bot Prompt Trigger has one or more variants and one of these variants is picked randomly to be displayed.
- Each variant contains:
- Bot prompt title:
- One variant can have only one Bot Prompt Title.
- Quick Replies:
- One variant can have 0, 2, 3, or 4 QRs. A variant cannot have just 1 single QR.
- Bot prompt title:
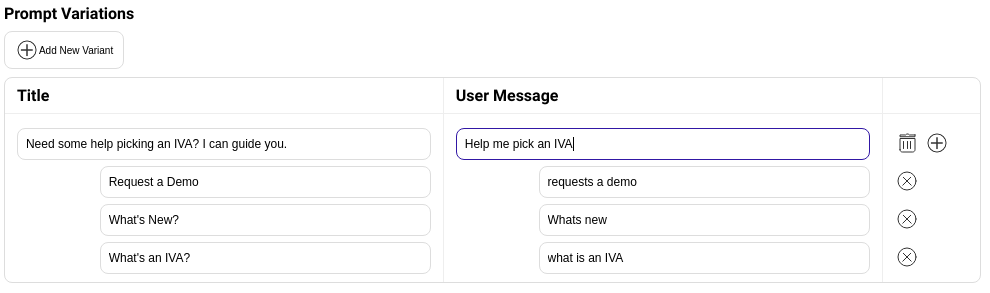
- Adding Variations
- Click on
Add New variant - In the
Titlesection, you enter the Bot Prompt Title - In the
User Messagesection, you enter the User Message that would be sent. - Adding QRs:
- Click on the + icon to the right of the Bot prompt title.
- A QRtitle and User Message fields appear nested under the Bot Prompt Title.
- Enter the values in the respective fields.
- Click + to add more QRs.
-
To add another variant, click again on
Add New Variantand repeat the above stages.
- Click on
Bot Prompt using prompt()
Bot Prompts can also be added using the prompt() function while integrating the Haptik SDK. You can add the method in the HTML page as shown below in the example.
prompt(title, userMessage)
The method will allow you to trigger the Bot Prompt on various custom events.
Params:
-
title <String>The text that's displayed on the bot prompt. -
userMessage <String>The message that's sent if the user taps on the bot prompt.
Try out the following example to add a Bot prompt using prompt() -
<!DOCTYPE html>
<html>
<head>
<title>Haptik JS SDK Custom Sign Up Demo</title>
<meta charset="UTF-8">
<meta content="width=device-width; initial-scale=1.0;" name="viewport">
</head>
<body>
<div style="width: 100%; padding-top: 100px;">
<div style="max-width: 7000px; margin: 0 auto; padding: 0 40px; text-align: left; font-family: Calibri;">
<h3>Bot Prompt using <i>prompt()</i></h3>
</div>
</div>
</body>
<script type="text/javascript"></script>
<script type="text/javascript" charset="UTF-8"
src="https://toolassets.haptikapi.com/platform/javascript-xdk/production/loader.js"></script>
<script>
document.addEventListener('haptik_sdk', function () {
HaptikSDK.prompt("How can I help you with? 👇", "", [{"title": "Track my order", "userMessage": "Track my order"},
{"title": "Refund and replacement", "userMessage": "Refund and Replacement"}])
});
</script>
</html>
<script> if (window.screen.width > CUSTOM_WINDOW_SCREEN_SIZE) {
document.addEventListener('haptik_sdk', function () {
HaptikSDK.prompt("How can I help you with? 👇", "", [{"title": "Track my order", "userMessage": "Track my order"},
{"title": "Refund and replacement", "userMessage": "Refund and Replacement"}])
}); }
</script>
