How to Deploy Haptik's Bot on LINE
- Getting Started
- Bot Building
- Smart Agent Chat
- Conversation Design
-
Developer Guides
Code Step Integration Static Step Integration Shopify Integration SETU Integration Exotel Integration CIBIL integration Freshdesk KMS Integration PayU Integration Zendesk Guide Integration Twilio Integration Razorpay Integration LeadSquared Integration USU(Unymira) Integration Helo(VivaConnect) Integration Salesforce KMS Integration Stripe Integration PayPal Integration CleverTap Integration Fynd Integration HubSpot Integration Magento Integration WooCommerce Integration Microsoft Dynamics 365 Integration
- Deployment
- External Agent Tool Setup
- Analytics & Reporting
- Notifications
- Commerce Plus
- Troubleshooting Guides
- Release Notes
LINE is a freeware app that supports instant communication via electronic devices such as smartphones, tablet computers, and personal computers. LINE users can exchange texts, images, videos, and audio. Users can also use this freeware to conduct audio calls and video conferences.
Imagine this scenario: a user requests a product detail or wants to discuss an issue outside of your business’ operating hours. With the Haptik bot on your business' LINE app, you will be helpful to provide a resolution to the user, or at least inform the user when to contact a live agent. This way the users don't have to wait until a CS agent arrives. As a business, having a bot on LINE opens up a new channel of communication with your users, providing them with more ways to connect with your business.
Prerequisites for having a LINE bot
The prerequisites include:
- A registered account on LINE. You can read more about it here. All LINE official accounts include API access.
- Availability: Open to everyone.
- Account Plan Tiers: Free / Basic (or Light) / Pro (or Standard).
- Account types: Premium / Verified / Unverified.
- A bot on Haptik. You can learn more about creating a bot here.
How to set up a LINE bot
The steps to set up a LINE bot are divided into the following four sections:
- Setting up LINE Messaging APIs
- Adding deployment details on Haptik
- Setting up Webhooks on LINE
- Testing your bot on LINE
1. Setting up LINE Messaging APIs
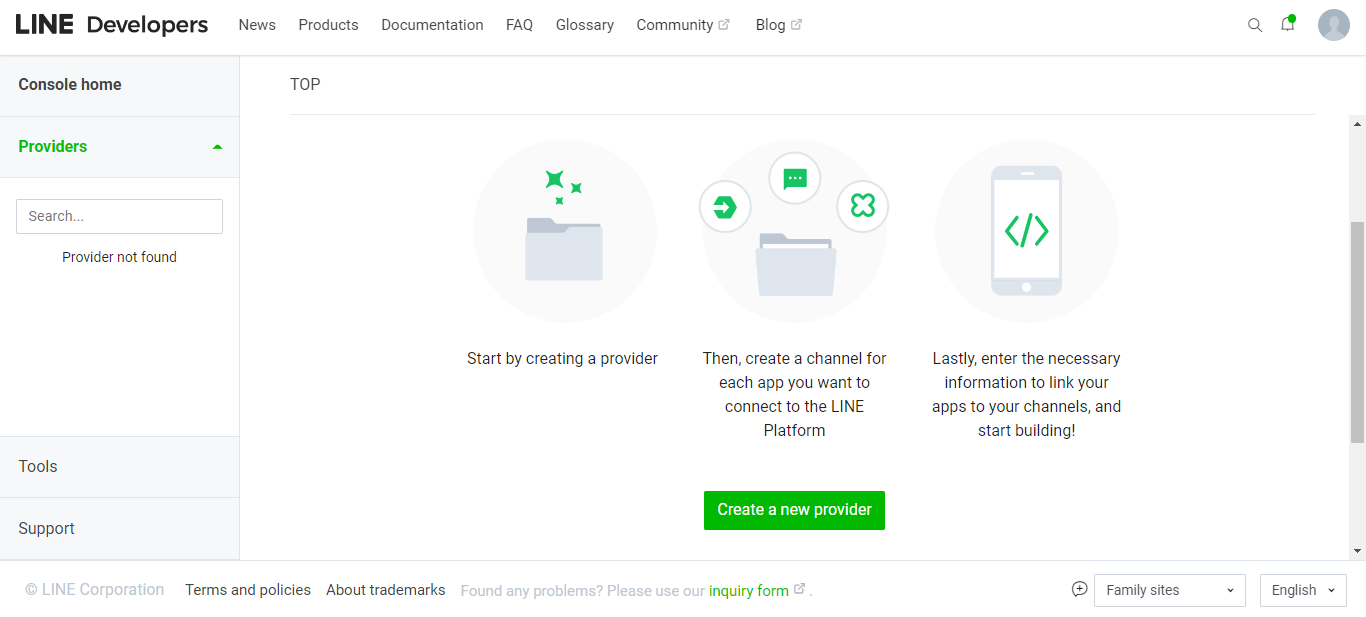
Step 1: Navigate to your LINE Console, by clicking here, and create a provider by clicking on Create a new provider button, as shown. On the LINE Developers site, an individual developer, company, or organization that provides services and acquires information from users is referred to as a Provider.
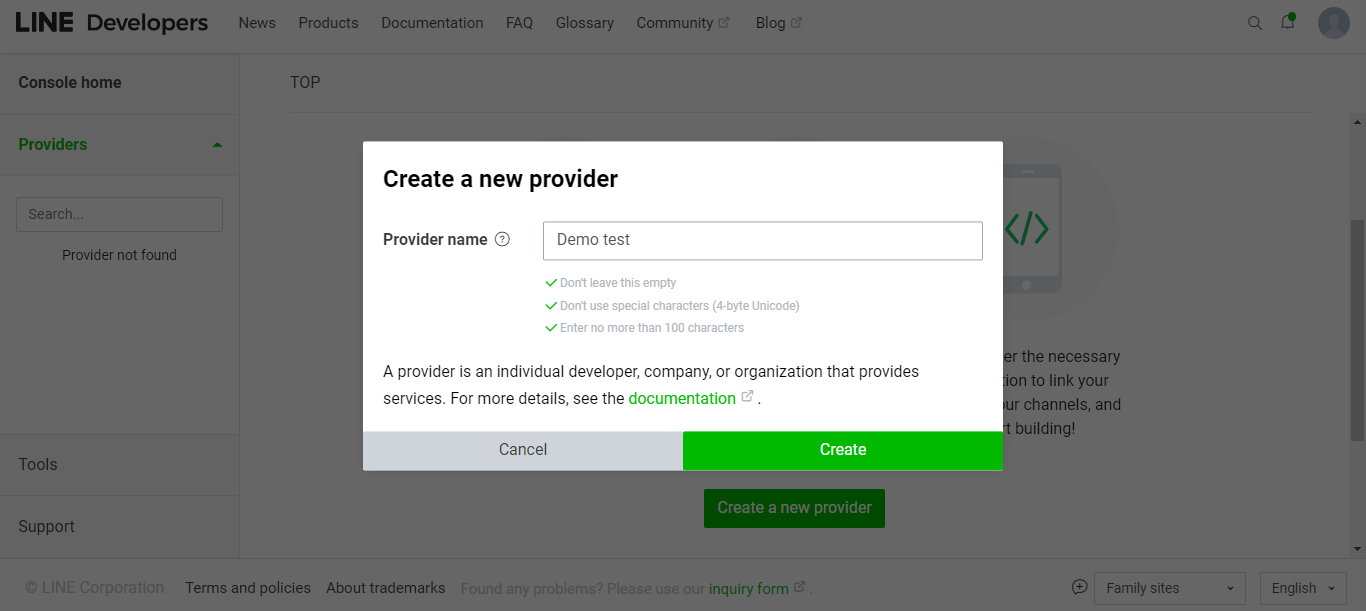
Step 2: You will be able to add a Provider name, as shown. This can be your organization's name.
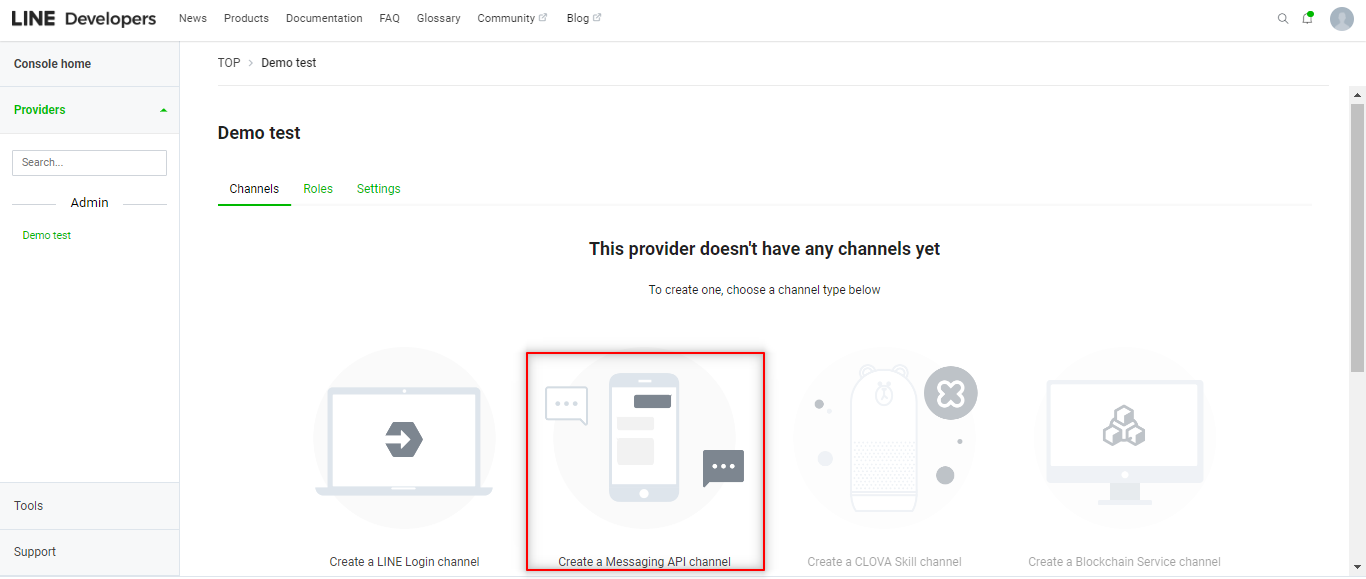
Step 3: Now that you have created a Provider, you need to add a Channel to it. A Channel is a communication path between the LINE Platform's functions and a provider's services. Click on Create a Messaging API Channel, as shown.
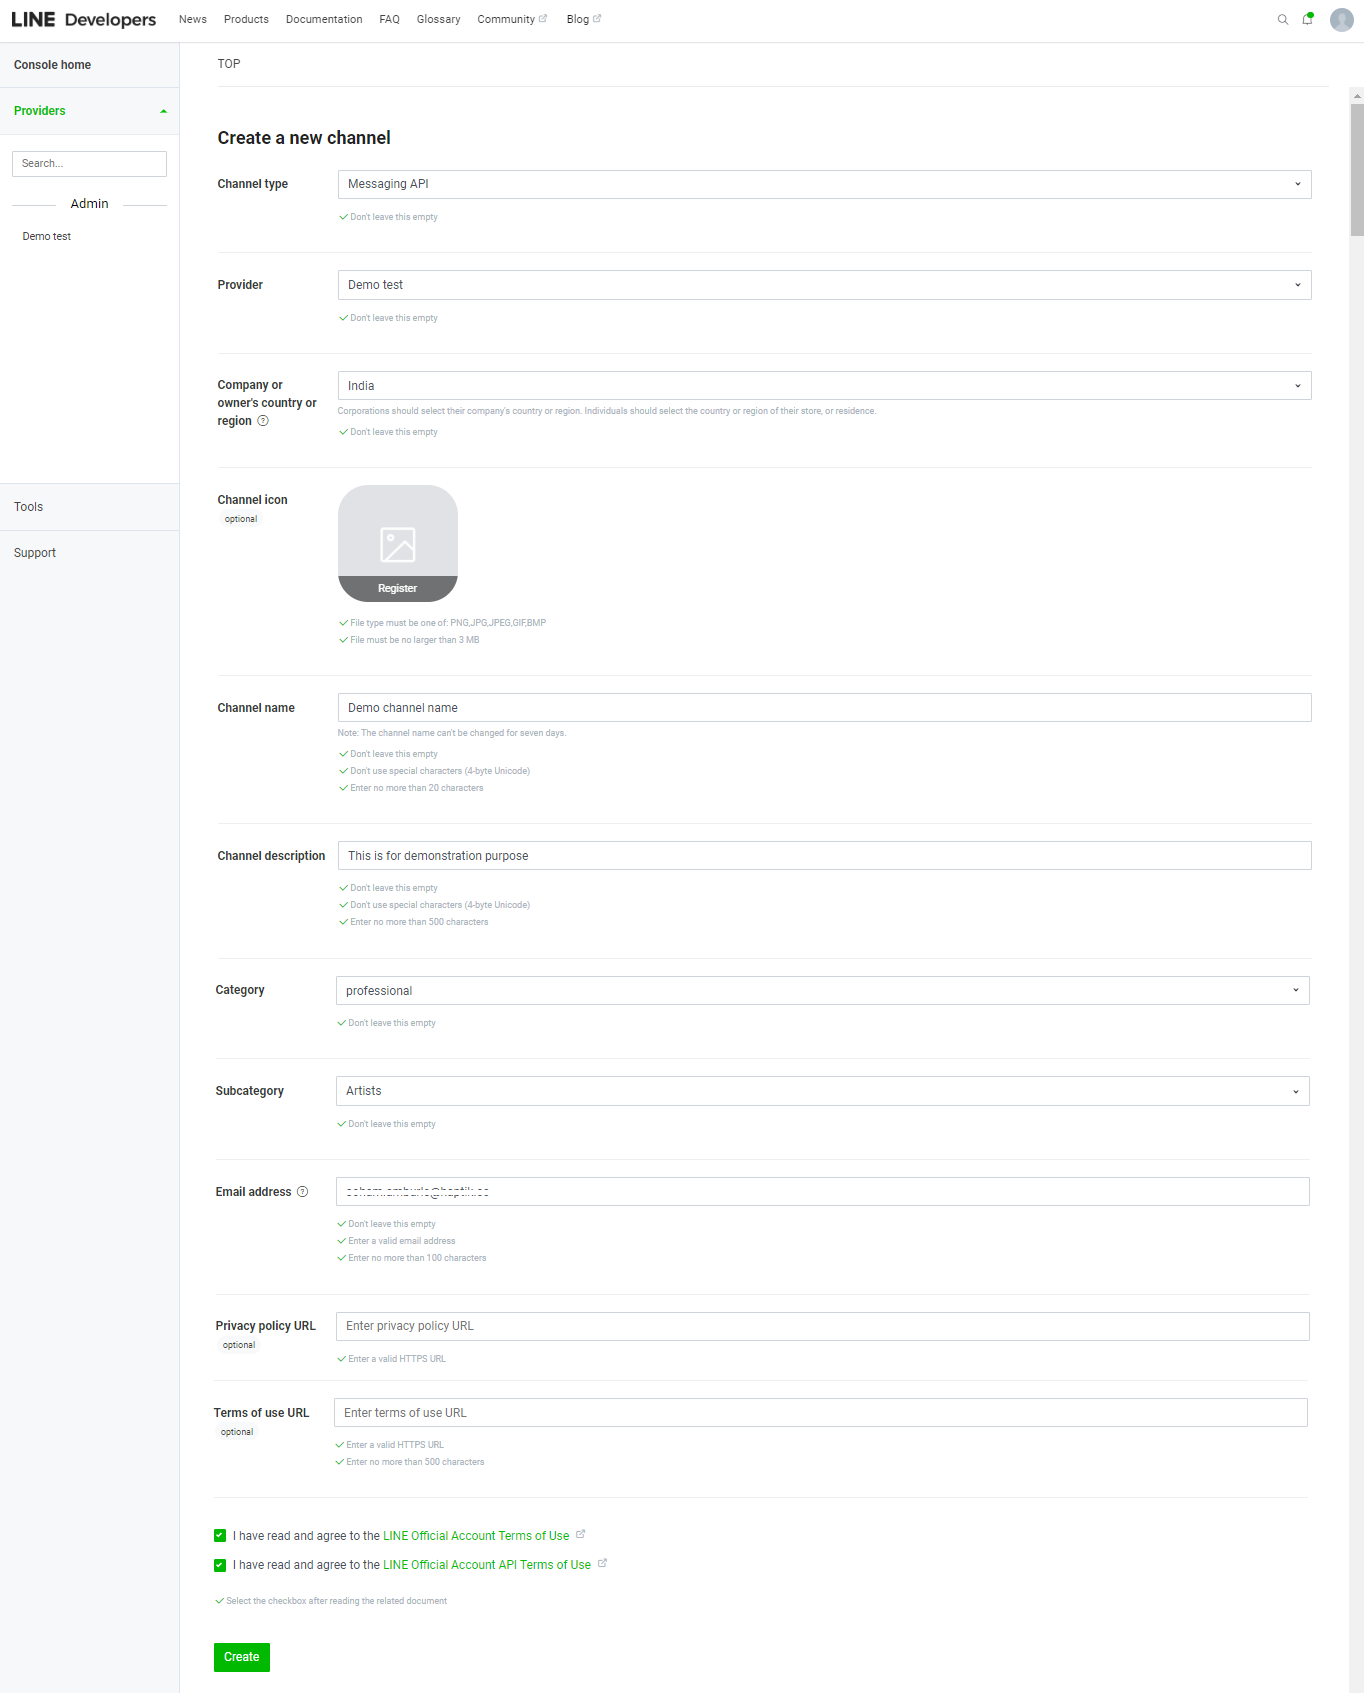
Step 4: Next, you will have to fill in the required details for creating a Channel, as shown.
Once you have accomplished the above, you are done with setting up LINE Messaging APIs. Next, we will move on to add deployment settings of your bot on Haptik.
2. Adding Deployment details on Haptik
In order to integrate the LINE Channel with your bot on Haptik, you need to follow the following steps.
Step 1: Now that you have your bot ready, open your bot on Haptik, and navigate to Business Manager > Channels > Platform Deployments, and under Platform dropdown, select LINE, as shown.
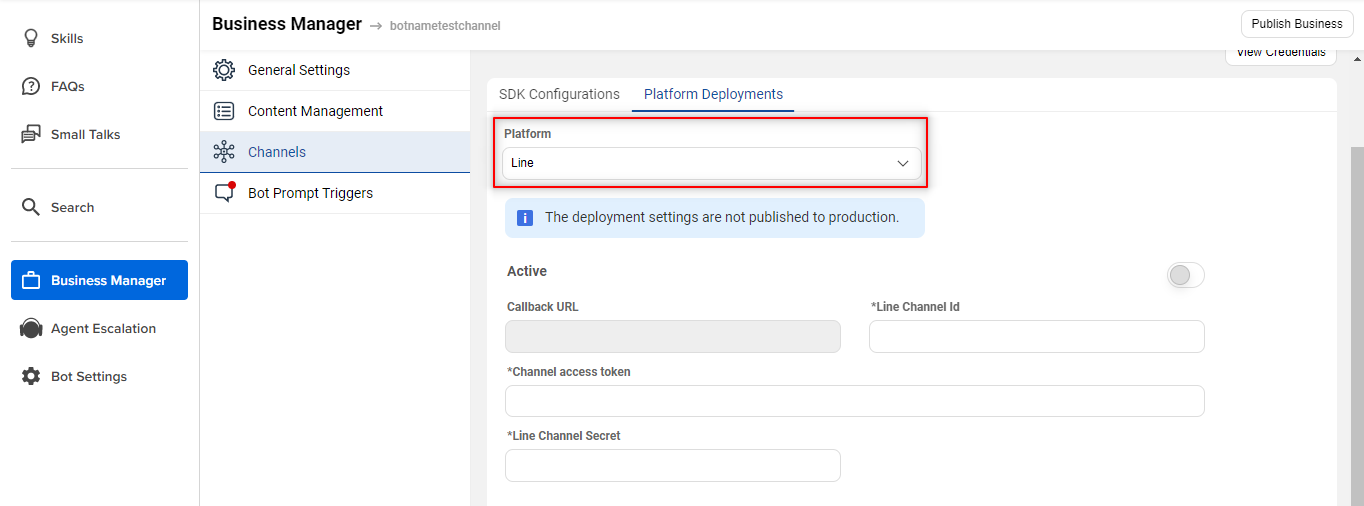
Step 2: Next, populate the following fields with the appropriate credentials from your LINE Developers Console:
- Line Channel Id
- Channel Access Token
- Line Channel Secret
The following illustrates how to get the credentials for each of the above.
Step 3: For, Line Channel Id, navigate to your LINE Developers Console and access the Channel ID in the Basic Settings. This is your Line Channel Id.
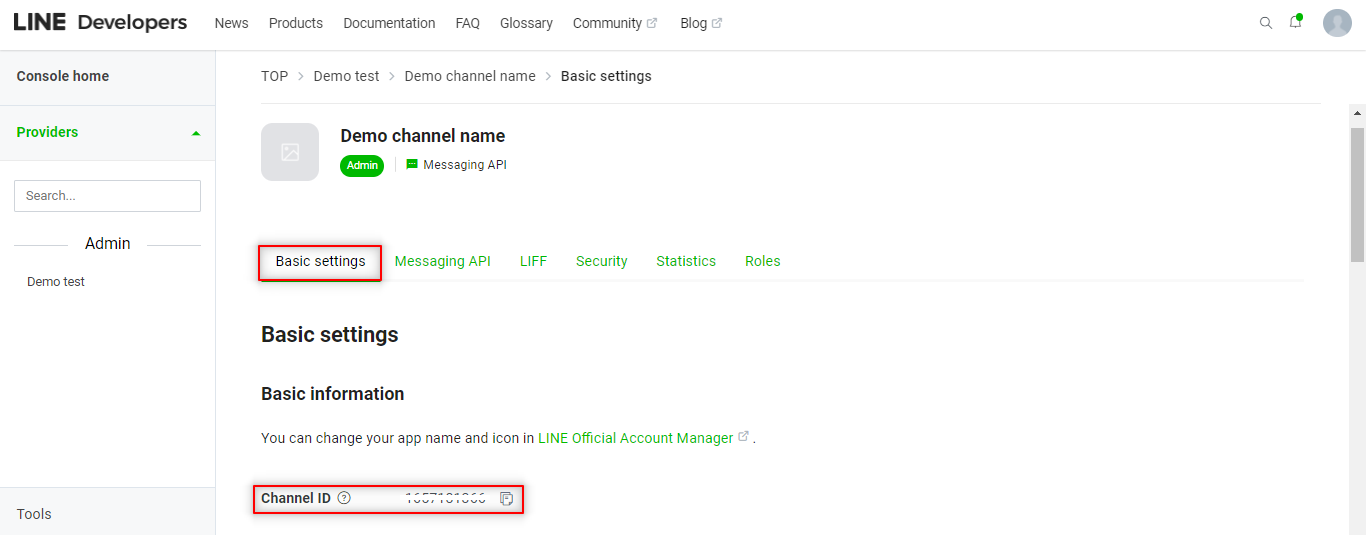
Step 4: For Channel Access Token, navigate to your LINE Developers Console, and select Messaging APIs. Here, if you scroll down, you will see an option for a Channel access token. You need to click on the Issue button, as shown.
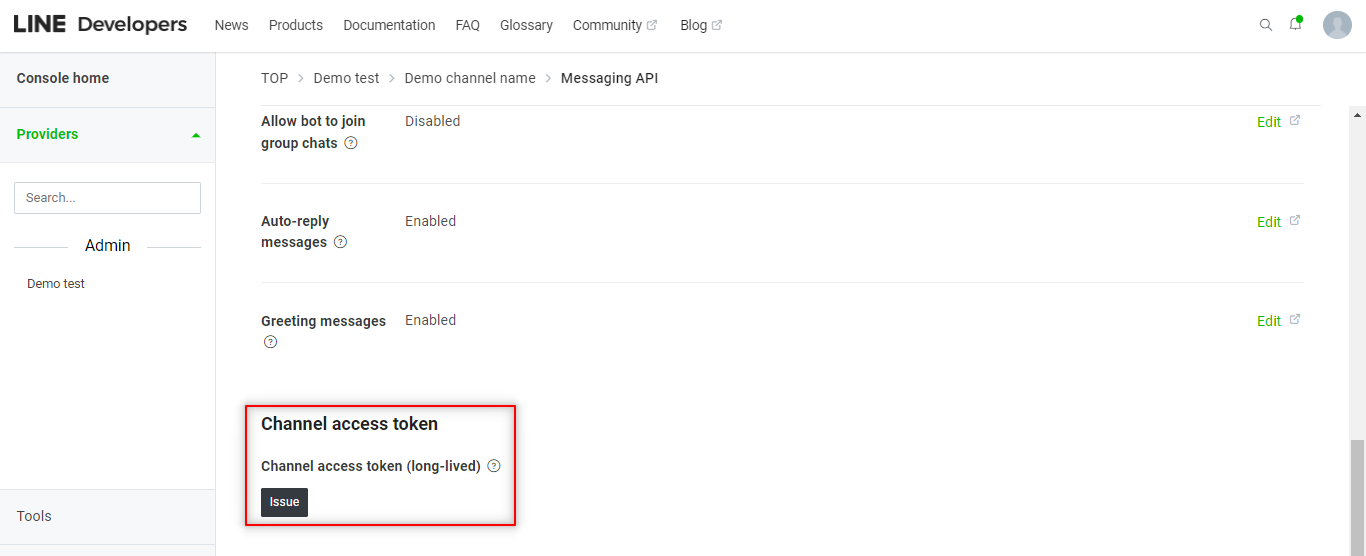
After clicking on Issue, you will be issued a long-lived Channel access token. Long-lived access tokens do not expire.

You can add this token in the Channel Access Token field.
Step 5: For Line Channel Secret, navigate to your LINE Developers Console, and select Basic Settings. Here, if you scroll down, you will see an option for a Channel secret. You can use this Channel secret or you can issue a new one, by clicking on the Issue button, as shown.

Step 6: Now that you have populated all the required fields, click on the Active toggle to enable it, then click on the Save button, as shown.
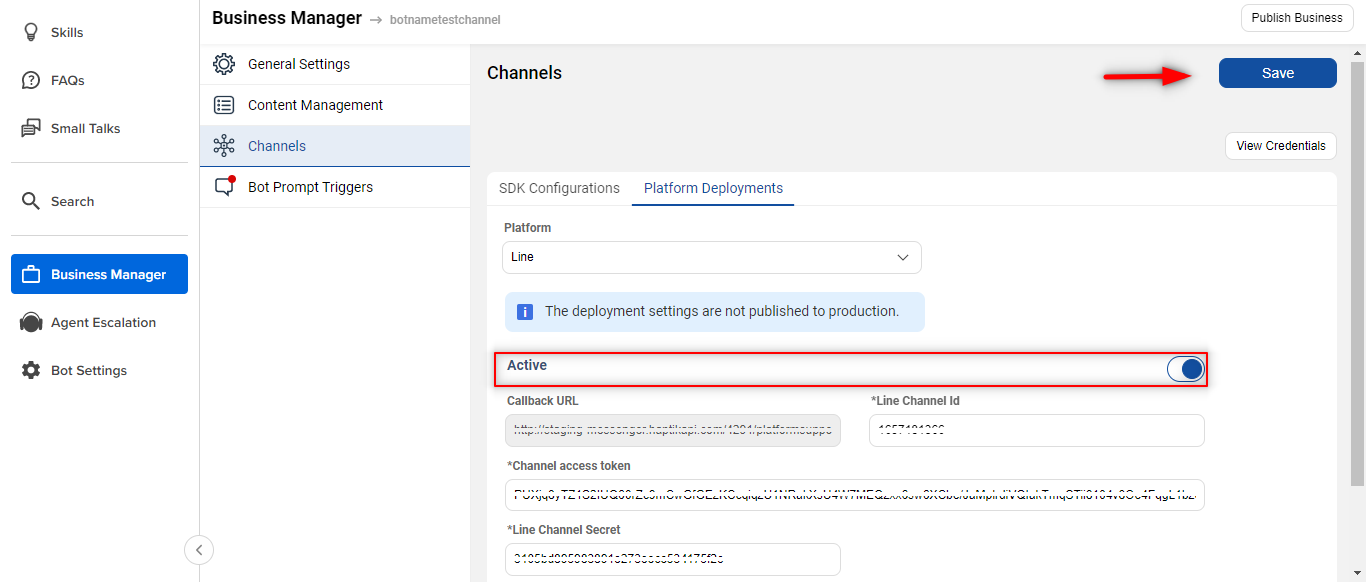
Once you have finished adding deployment details on Haptik, you can move on to Setting up Webhooks on LINE.
3. Setting up Webhooks on LINE
Now that you are done with most of the integration, the final thing that you need to do is set up Webhooks on LINE. After setting up Webhooks, your Haptik bot connected to LINE will be able to listen to events, as and when they occur on your bot deployed on LINE. This allows the bot to respond to user queries efficiently and quickly.
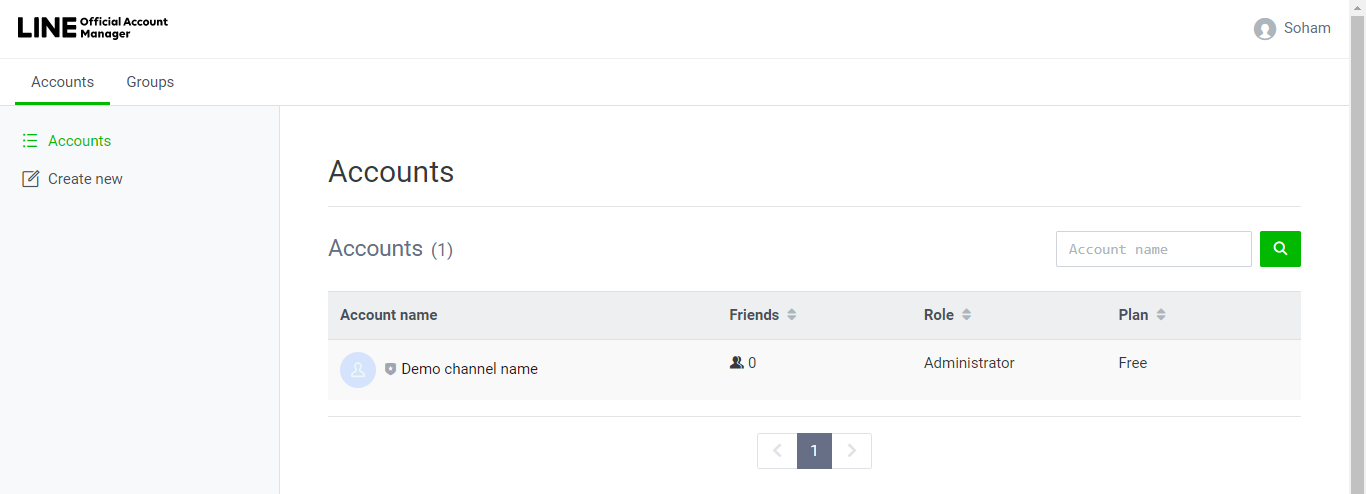
Step 1: Navigate to LINE Account Manager, by clicking here, and select the Account, as shown.
Step 2: Under LINE Account Manager, select Settings, as shown.

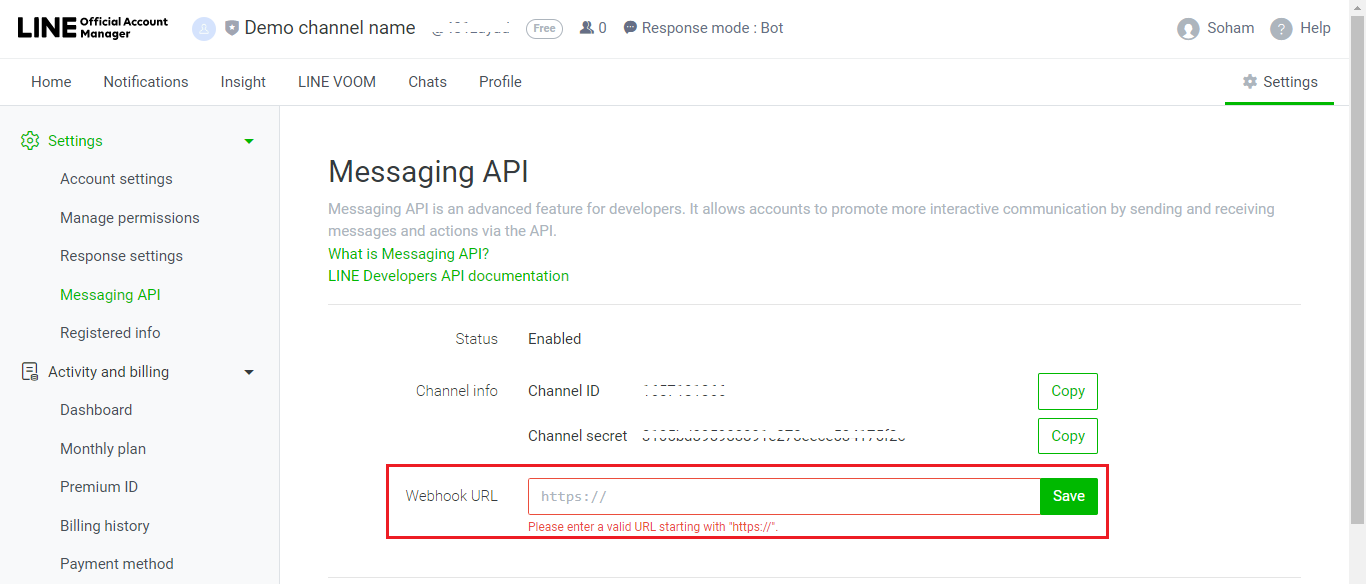
Step 3: Under Settings, select Messaging APIs. Here, you will have to add a Webhook URL.
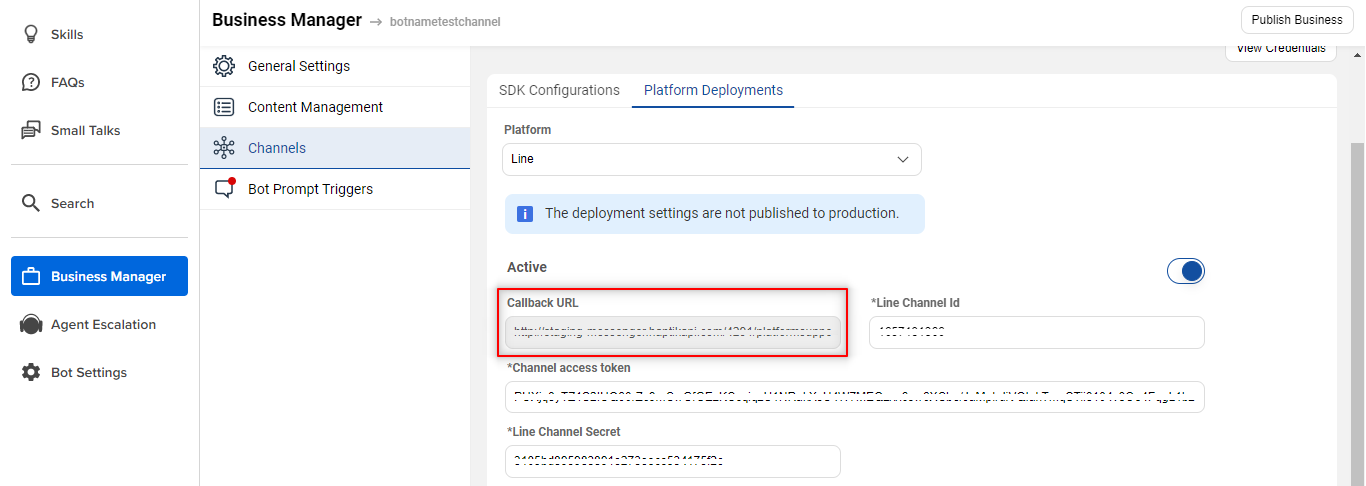
To fetch this Webhook URL, open your bot on Haptik, and navigate to Business Manager > Channels > Platform Deployments, and under Platform dropdown, select LINE, as shown. You will see a Callback URL here. You need to copy this Callback URL.
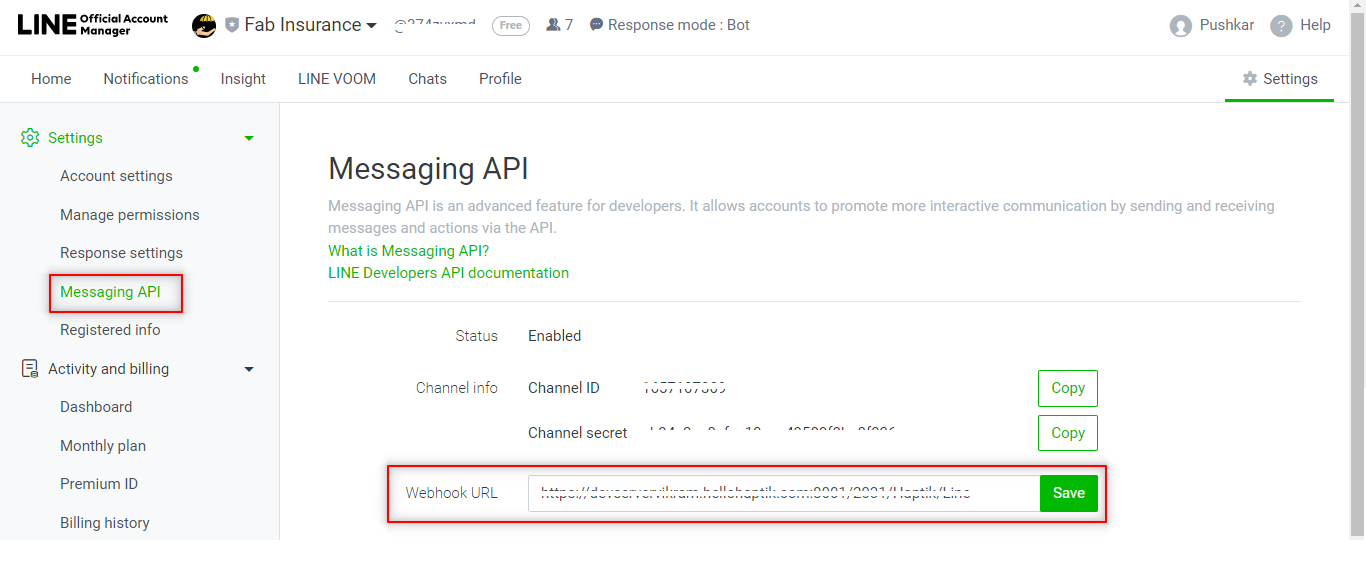
Next, paste this Callback URL in the Webhook URL section on the LINE Account Manager, as shown.
Once you have completed your setup of Webhooks, you are done with the process of deploying your Haptik bot on LINE.
You can now test your bot on LINE. Its interface looks exactly like the interface used to chat with friends on LINE messenger. The only difference here would be that a bot will be replying to your queries.
4. Testing your bot on LINE
In order to test your bot on LINE, download LINE from Playstore or the App Store (depending on your phone's OS). Once you have downloaded and set up your account on LINE, you can move on to testing your bot.
Step 1: Simply click on the Add icon, after which you can select how you wish to chat with your bot. You can choose either the QR Code or the Search option.
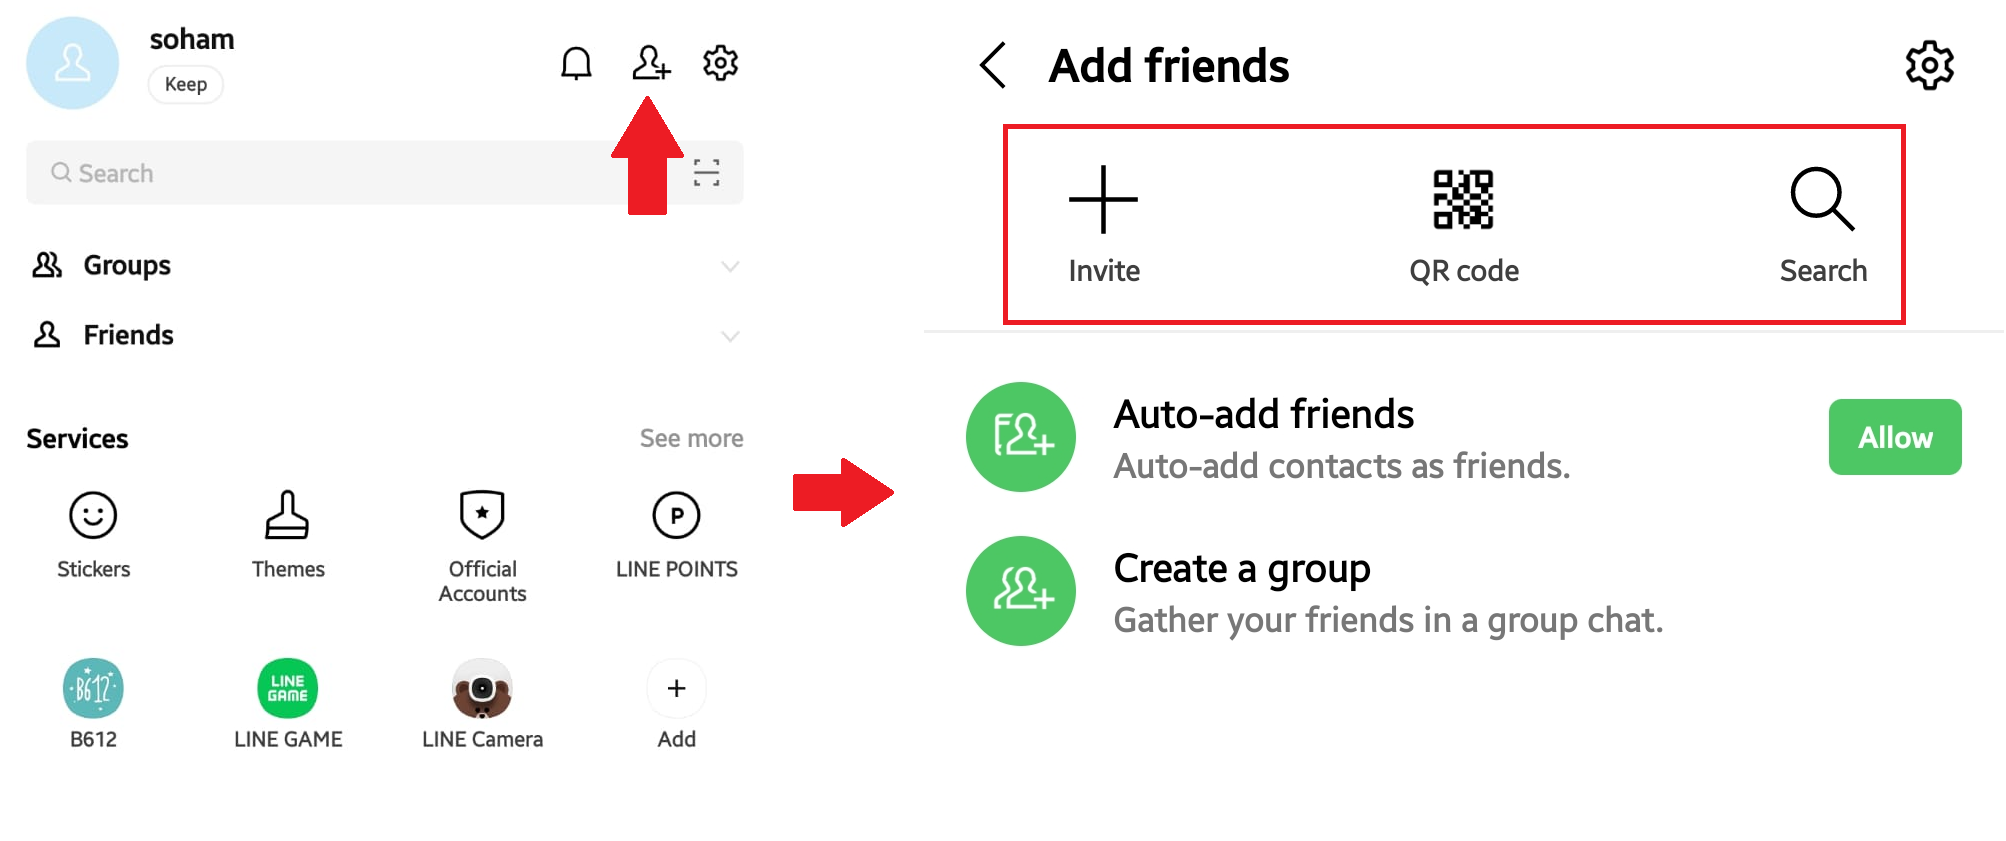
Step 2: In order to chat with your bot, you can scan the LINE QR Code for your business or run a search using LINE's bot basic ID for your business. To fetch these, navigate to your LINE Developers Console > Providers > Channel > Messaging APIs. Here, you can find your QR Code as well as your Bot basic Id.
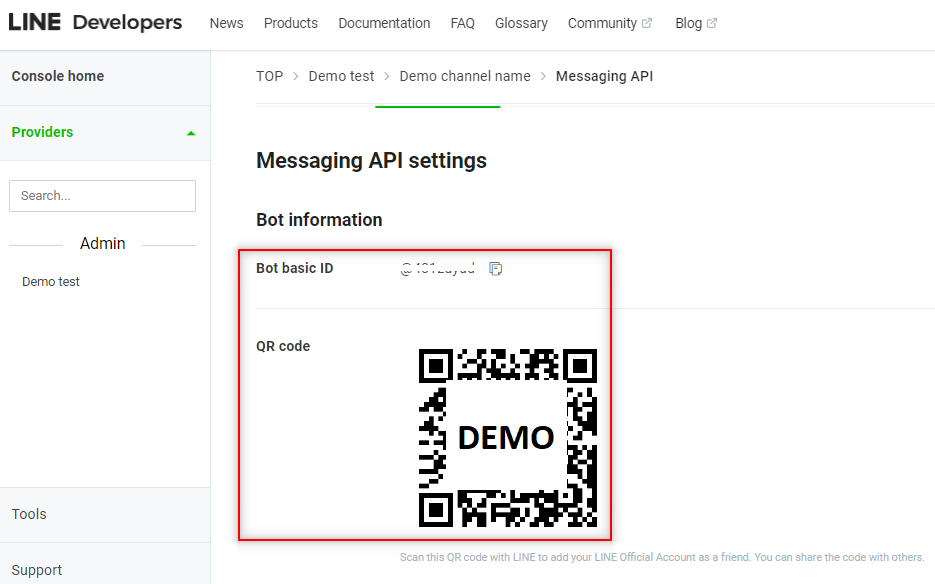
Step 3: If you select the QR Code option, you can scan the QR code and the account associated with the QR Code will come up on your screen. Similarly, if you select the Search option, you can copy the Bot basic ID and paste it into the search bar, and the account associated with that ID will come up, as shown.
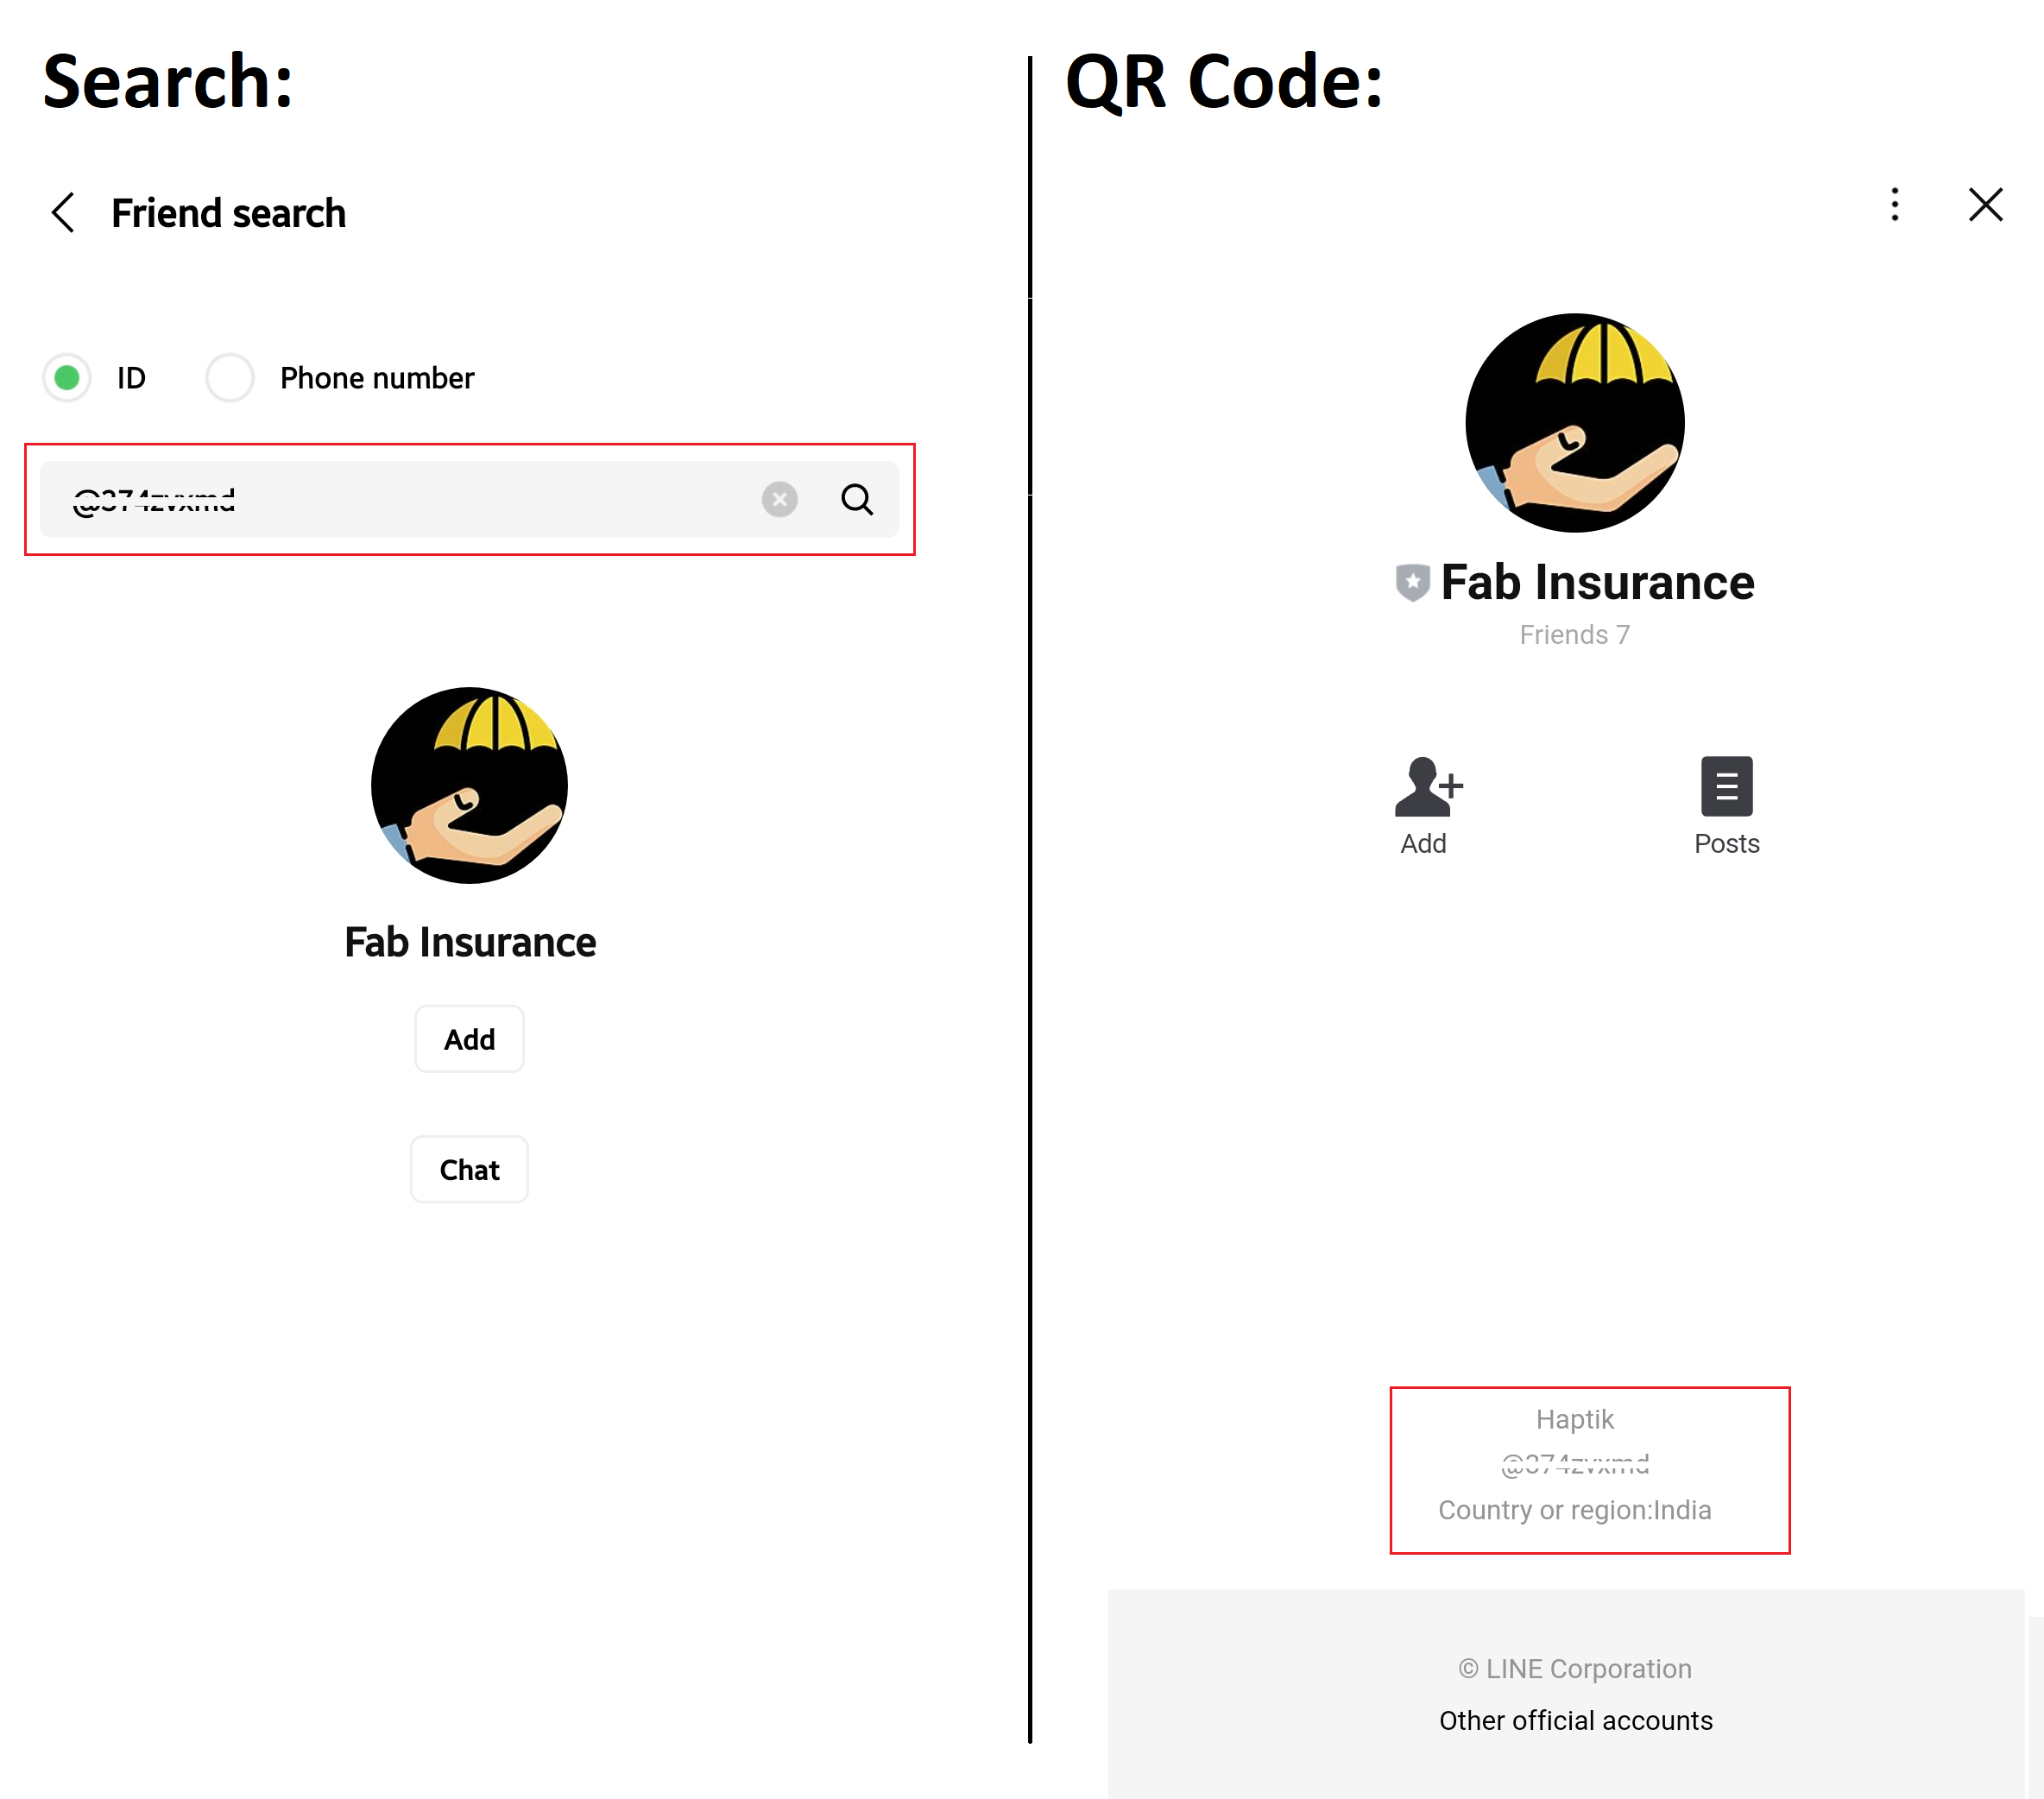
Step 4: Once you click on the Add button as shown in the image above, you will move to the bot's conversation screen where you can ask queries to the bot in order to test the flows, as shown.
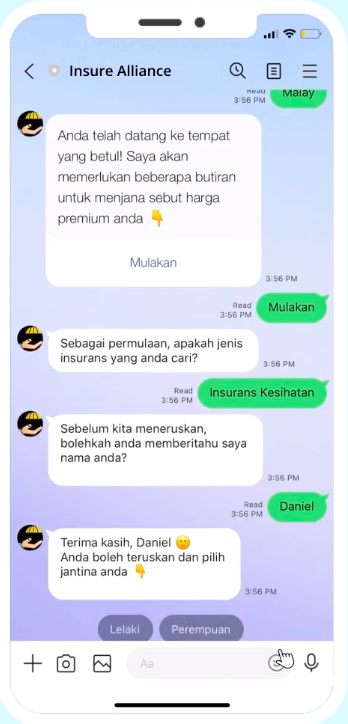
Once you have successfully tested your bot, your Integration is complete. Congratulations!
You can check this below video to see LINE Integration in action.
