How to Use the LeadSquared Add Lead Sales Activity Smart Skill
- Getting Started
- Bot Building
- Smart Agent Chat
- Conversation Design
-
Developer Guides
Code Step Integration Static Step Integration Shopify Integration SETU Integration Exotel Integration CIBIL integration Freshdesk KMS Integration PayU Integration Zendesk Guide Integration Twilio Integration Razorpay Integration LeadSquared Integration USU(Unymira) Integration Helo(VivaConnect) Integration Salesforce KMS Integration Stripe Integration PayPal Integration CleverTap Integration Fynd Integration HubSpot Integration Magento Integration WooCommerce Integration Microsoft Dynamics 365 Integration
- Deployment
- External Agent Tool Setup
- Analytics & Reporting
- Notifications
- Commerce Plus
- Troubleshooting Guides
- Release Notes
This Smart Skill can be used by you in order to update the Sales activity of your leads on the LeadSquared CRM tool.
Name of the Skill on Conversation Studio: leadsquared add sales activity
Purpose of the Skill: This Smart Skill is designed to generate a flow that can then be used by the user to update their Sales Activity on LeadSquared
What’s the design template going to look like?
This Skill is designed to provide quick resolution & to provide seamless addition of Lead Sales activity experience to the user. Please reach out to your Haptik SPOC who will connect you with the Conversation Designer to get access to the design - Lucidchart or PDF.
Requirements
- A registered account on LeadSquared. You can read more about it, here.
- A bot on Haptik. You can read this article to build your own bot.
How to use the Skill
For testing purposes, you can type an intent related to the creation of lead.
For example, the users can type ‘I want to add sales’ to start off the flow
How to make changes to the Skill
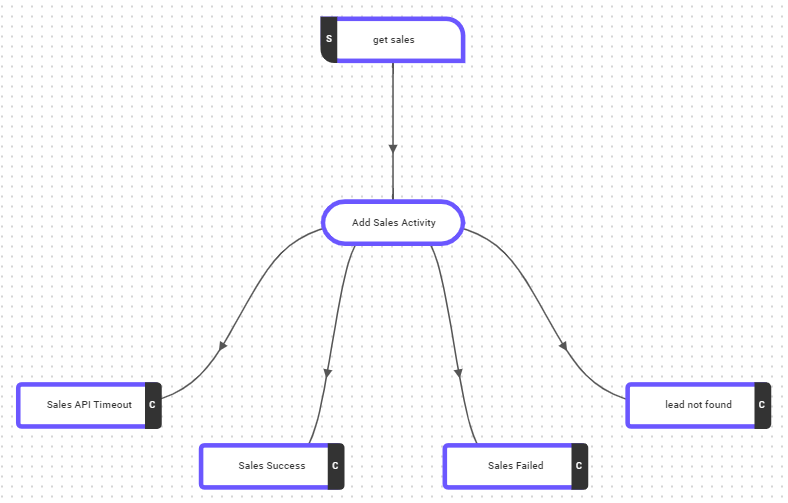
Following is the structure of the Smart Skill:

Step 1: The Start Step get Sales will first collect the user's information when the user types an appropriate intent. This Step has one entity Leadsquare_mobile_email_for_activity_entity for collecting the user's phone number or email id.

Step 2: Next, the flow moves to the Code Step Add Sales Activity. This is the Step that is responsible for updating the Lead's Sales Activity in the CRM system.
The API that is used for updating the address(create_sales_activity) requires a few business-specific fields, that can be obtained from the LeadSquared CRM dashboard. They are:
- API host
- Access Key
- Secret Key
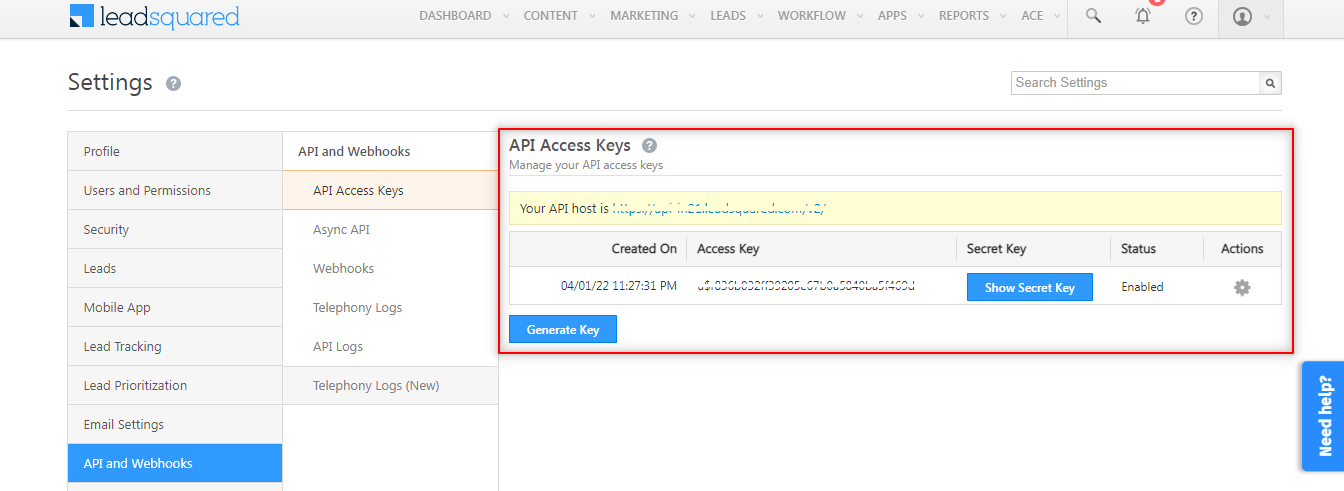
In order to obtain these, navigate to your LeadSquared dashboard, and click on Settings, as shown.

Next, click on API and Webhooks, and you will get the API host and Access Key. For Secret Key, you will have to click on the Show Secret Key button, as shown.
If the Access Key is not available, click on the Generate Key button to generate a new Access Key. 
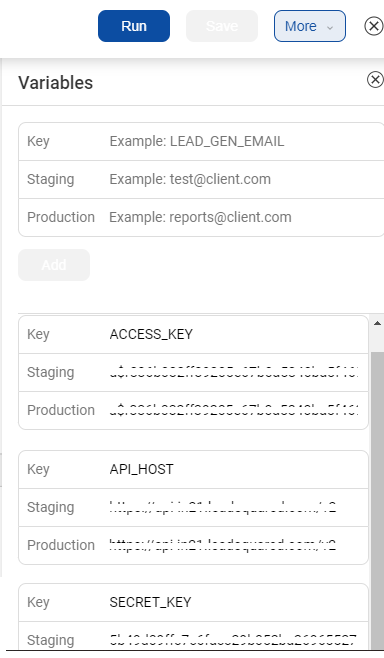
The API host, Access Key, and Secret Key that you receive need to be configured under the Environment Variables in a Code Step. Click on any Code Step and open the Code Editor. Now, select the More option on the top right corner of the screen and select Variables, as shown below.

In the variables, you need to configure the API host, Access Key, and Secret Key, as shown below.
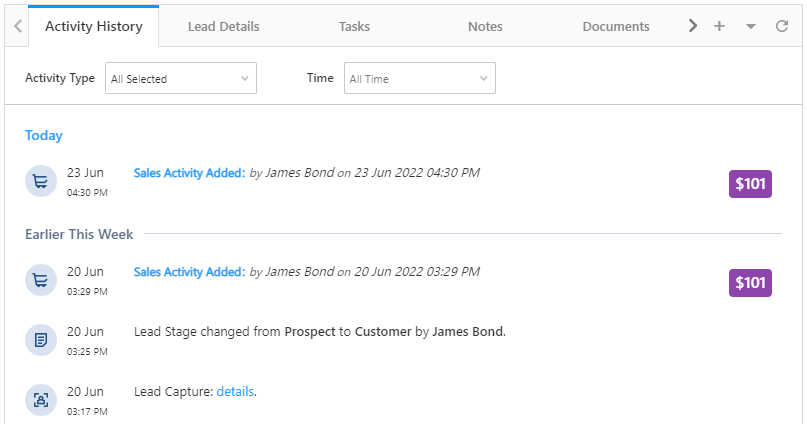
Step 4: Once the flow passes the Code Step, it reaches the final Output Steps, and based on the user's journey, the appropriate response is sent like whether the lead's Sales Activity was updated or not, and similarly on the success response, you will see a lead's Sales Activity updated under Activity History, on the LeadSquared CRM, as shown.

How to analyze your Skill post go-live
To track the usage of this Skill on your virtual assistant, you can create Smart Funnels on the Intelligent Analytics tool. You can learn more about Smart Funnels here.
Smart Funnel suggestion:
- Start point: get sales
-
Endpoints:
- Sales API Timeout
- Sales Success
- Sales Failed
- lead not found
