What is Gorgias Integration? How to Set Up Haptik and Gorgias Integration
- Getting Started
- Bot Building
- Smart Agent Chat
- Conversation Design
-
Developer Guides
Code Step Integration Static Step Integration Shopify Integration SETU Integration Exotel Integration CIBIL integration Freshdesk KMS Integration PayU Integration Zendesk Guide Integration Twilio Integration Razorpay Integration LeadSquared Integration USU(Unymira) Integration Helo(VivaConnect) Integration Salesforce KMS Integration Stripe Integration PayPal Integration CleverTap Integration Fynd Integration HubSpot Integration Magento Integration WooCommerce Integration Microsoft Dynamics 365 Integration
- Deployment
- External Agent Tool Setup
- Analytics & Reporting
- Notifications
- Commerce Plus
- Troubleshooting Guides
- Release Notes
Table of Contents
Leveraging Gorgias Integration with a Haptik bot will allow you to provide finer customer service. Using Haptik, you can build AI-powered user journeys which help your users to get their queries resolved faster.
Gorgias (pronounced 'gorgeous') is a customer support platform built for e-commerce businesses. You can connect your customer service channels and manage all of them from inside one Gorgias dashboard.
Prerequisites for having a bot with Gorgias integration
Following are the prerequisites:
- A bot on Haptik. You can read this article to build your own bot.
- A registered account on Gorgias. You can read more about it here.
How to set up Gorgias + Haptik Integration
The steps for Setup are divided into different sections:
- Create Gorgias Widget on your website
- Configure Webhooks for Haptik IVA
- Configure Webhooks for Gorgias Widget
- Add Haptik IVA as a User
- Add Users(Agents) on Gorgias.
- Create teams on Gorgias.
- Set Rules for the incoming tickets.
- Set Ticket Assignment.
- Configure Gorgias on Haptik.
1. Create Gorgias Widget on your website
Since this bot will be on your website, hosted on Gorgias's SDK, we will have to create a Widget in order to enable the bot's presence.
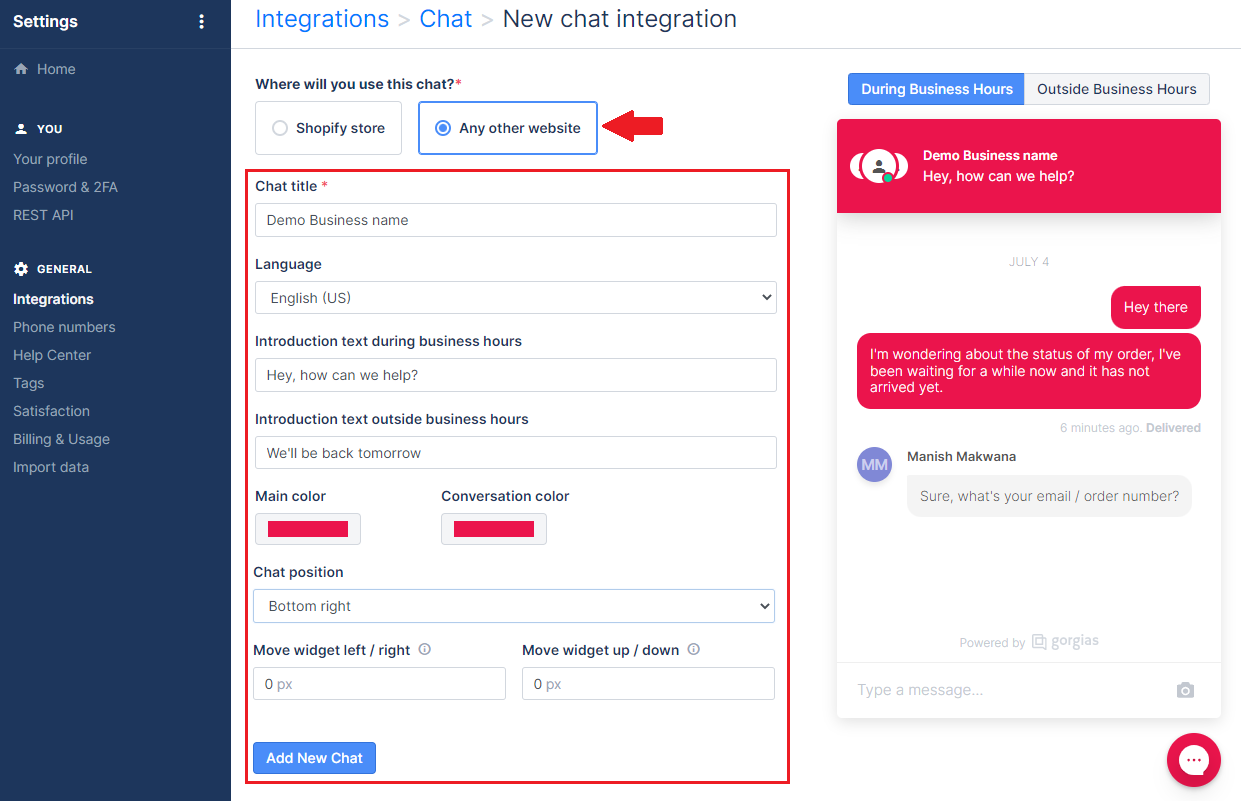
Step 1: Open your Gorgias account, and navigate to Settings > Integrations > Chats. Here, you will ahve to click on the Add New button in order to create a widget.

Step 2: Under New Chat integration, you will have to first select Any other website option, and then you can fill the rest of the fields as per your requirements and click on the Add New Chat button, as shown below. As you add relevant data to the given fields, you will see that data reflected in the demo preview alongside, which will show you how your final widget will look.
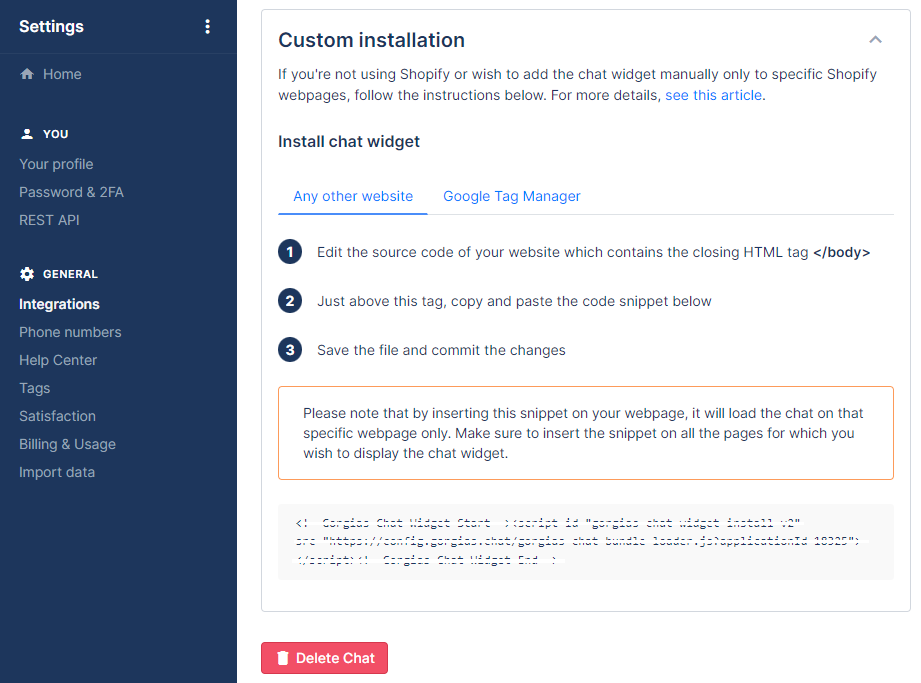
Step 3: After clicking on the Add New Chat button land on the Installation page. Here, you need to scroll down to Custom Installation and copy the code given there, paste it into your website's source code, and save the file.
Once you have created a widget on Gorgias's dashboard, you need to configure Webhooks.
2. Configure Webhooks for Haptik IVA
You will have to configure two webhooks for Haptik IVA:
- Ticket message created: This will trigger an event on your Haptik IVA, every time a new user enters the chat.
- Ticket updated: This will trigger an event when a chat is handed over to an agent.
In order to configure these webhooks, navigate to your Gorgias account > Settings > Integrations > HTTP, and click on Add HTTP Integration, as shown below.
Ticket Message Created -
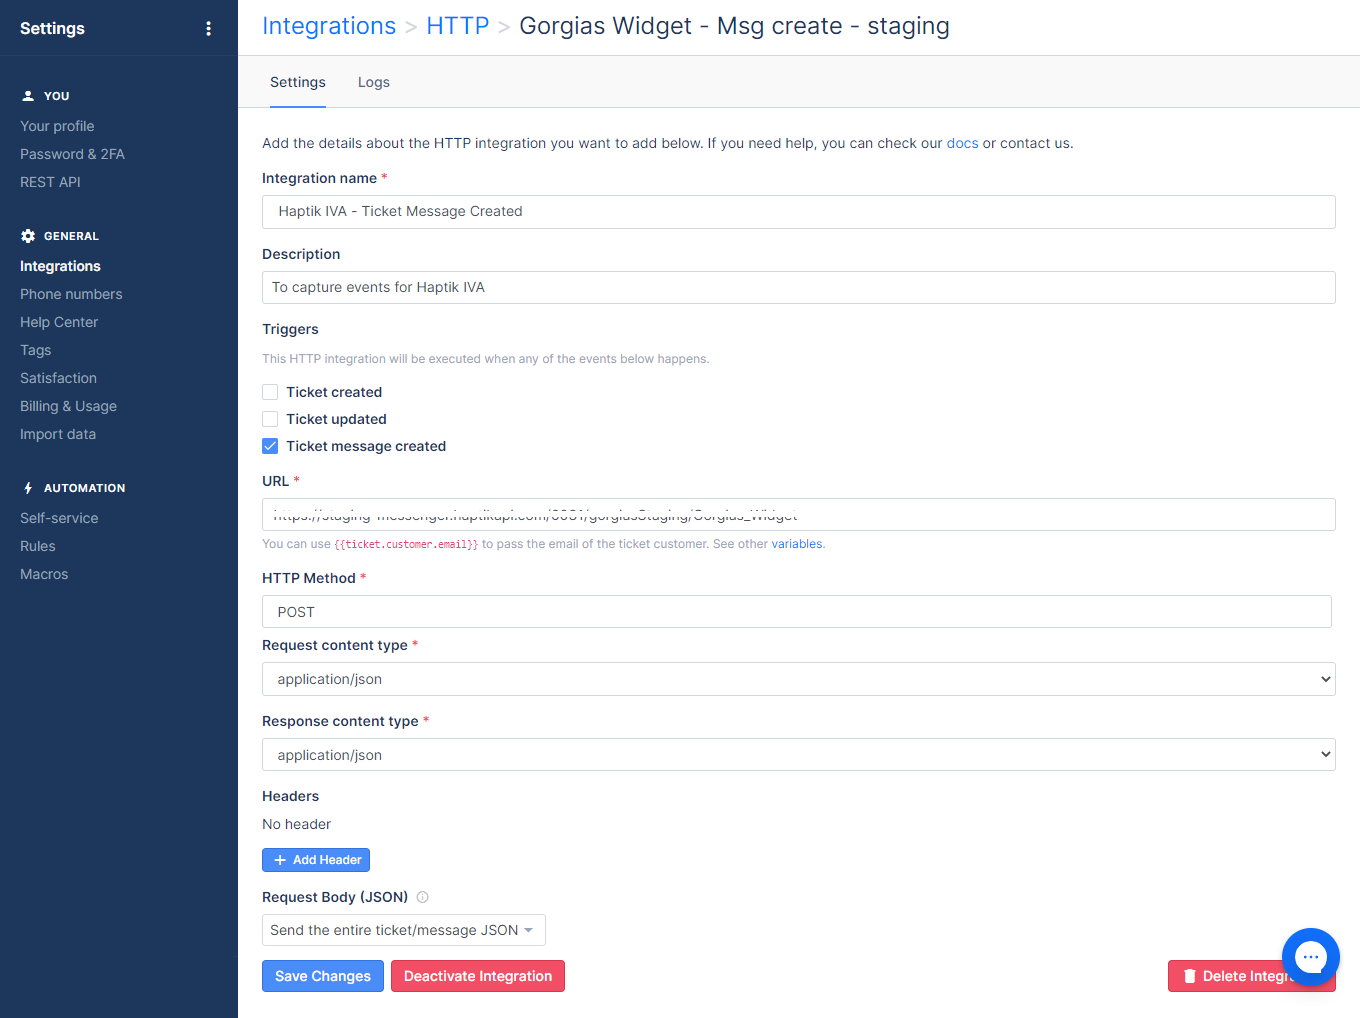
For the webhook, Ticket message created you will have to add the following details in the following fields:
- Integration name: Add a suitable name to your integration.
- Description: Add a description to your integration.
- Triggers: Under the Triggers checklist, select the Ticket message created.
- URL: This will be the Callback URL from the Platform Deployments section of your bot, under Gorgias Widget Platform on Haptik.
- HTTP Method: You need to select POST here.
- Request Content Type: Select application/json here.
- Response Content Type: Select application/json here.
- Headers: Keep it as it is, i.e No headers.
- Request Body JSON: You need to select Send the entire ticket/message JSON here.
Once you have added all the necessary details, click on the Save Changes button.
Ticket Updated -
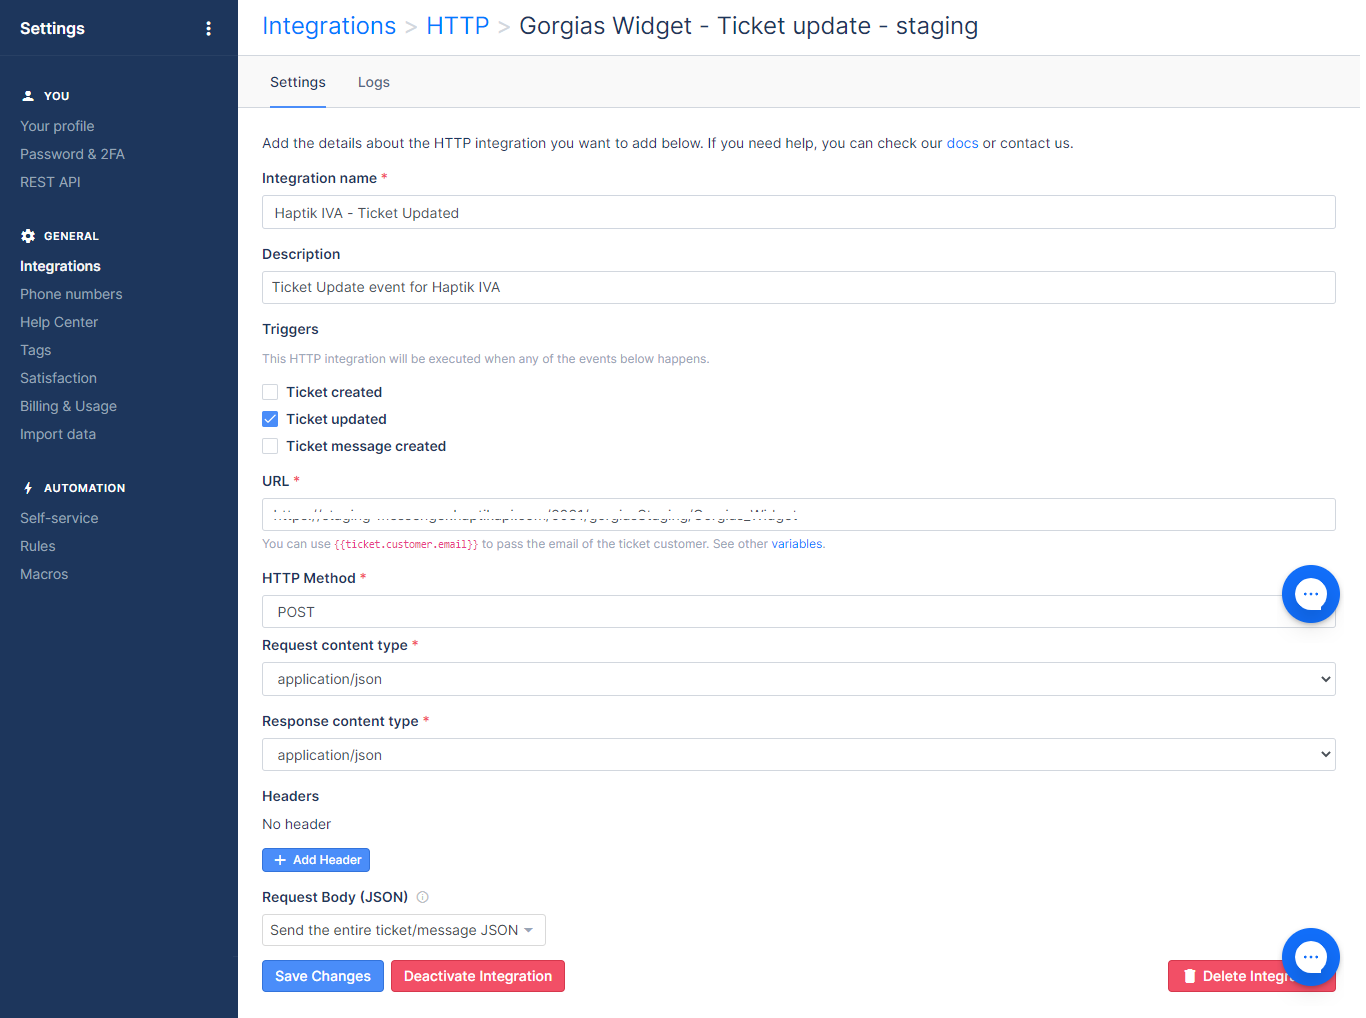
For the webhook, Ticket Updated, you will have to add the following details in the following fields:
- Integration name: Add a suitable name to your integration.
- Description: Add a description to your integration.
- Triggers: Under the Triggers checklist, select Ticket updated.
- URL: This will be the Callback URL from the Platform Deployments section of your bot, under Gorgias Widget Platform on Haptik.
- HTTP Method: You need to select POST here.
- Request Content Type: Select application/json here.
- Response Content Type: Select application/json here.
- Headers: Keep it as it is, i.e No headers.
- Request Body JSON: You need to select Send the entire ticket/message JSON here.
Once you have added all the necessary details, click on the Save Changes button.
Next, you will have to configure Webhooks for Gorgias Widget.
3. Configure Webhooks for Gorgias Widget
You will have to configure two webhooks for Gorgias Widget:
- Ticket message created: This will trigger an event, every time a new user enters the chat.
- Ticket updated: This will trigger an event when a chat is handed over to an agent.
In order to configure these webhooks, navigate to your Gorgias account > Settings > Integrations > HTTP, and click on Add HTTP Integration, as shown below.

Ticket Message Created -
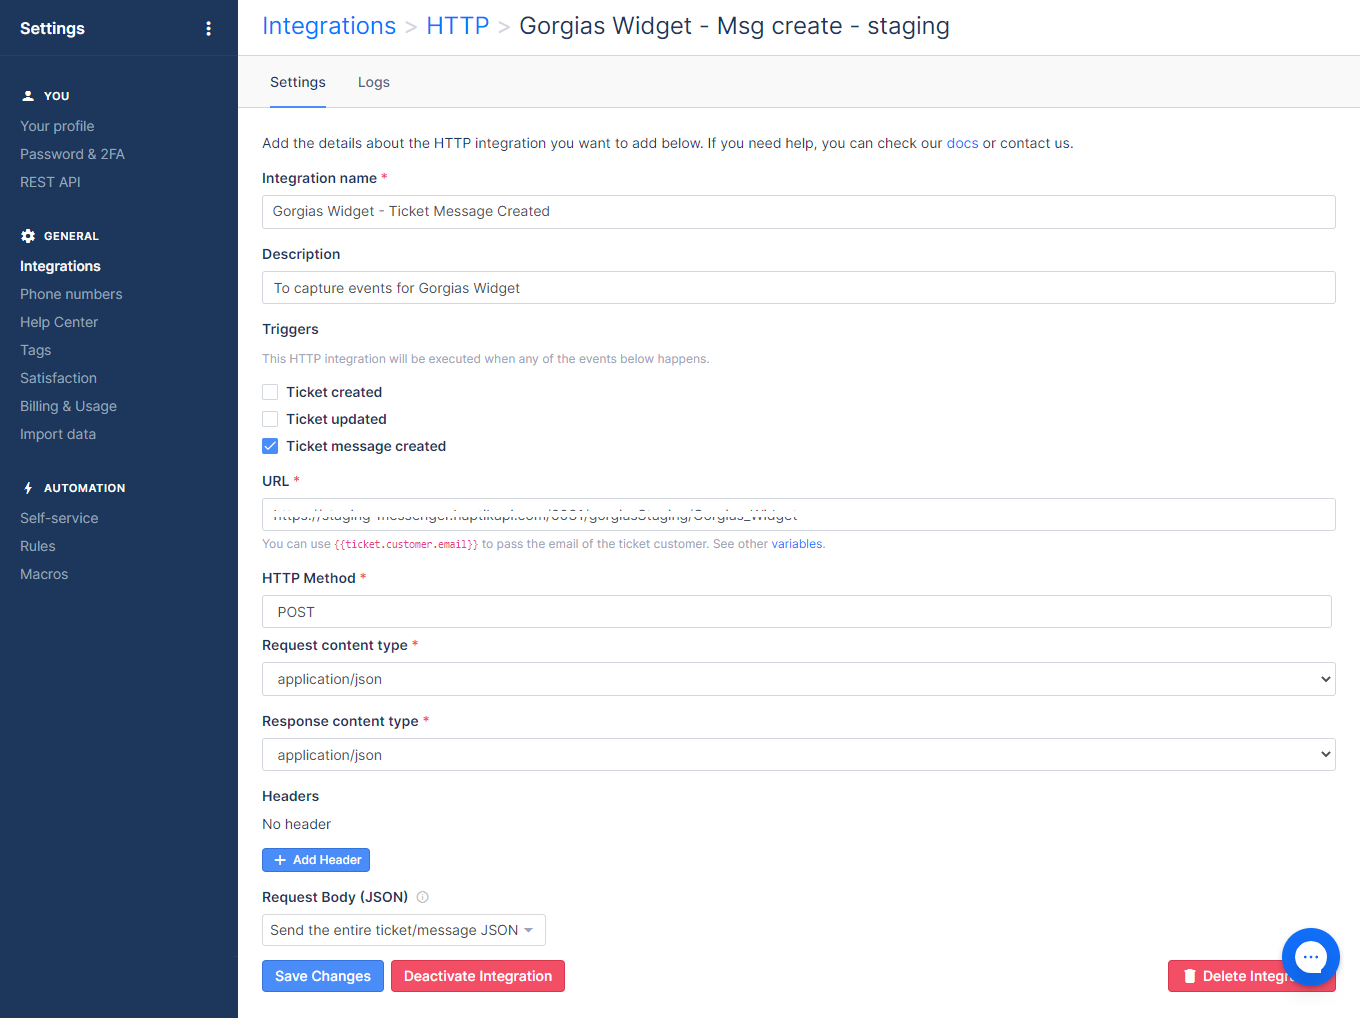
For the webhooks, Ticket message created, you will have to add the following details in the following fields:
- Integration name: Add a suitable name to your integration.
- Description: Add a description to your integration.
- Triggers: Under the Triggers checklist, select Ticket message created.
- URL: This will be the Callback URL from the Platform Deployments section of your bot, under Gorgias Widget Platform on Haptik.
- HTTP Method: You need to select POST here.
- Request Content Type: Select application/json here.
- Response Content Type: Select application/json here.
- Headers: Keep it as it is, i.e No headers.
- Request Body JSON: You need to select Send the entire ticket/message JSON here.
Once you have added all the necessary details, click on Save Changes button.
Ticket Updated -
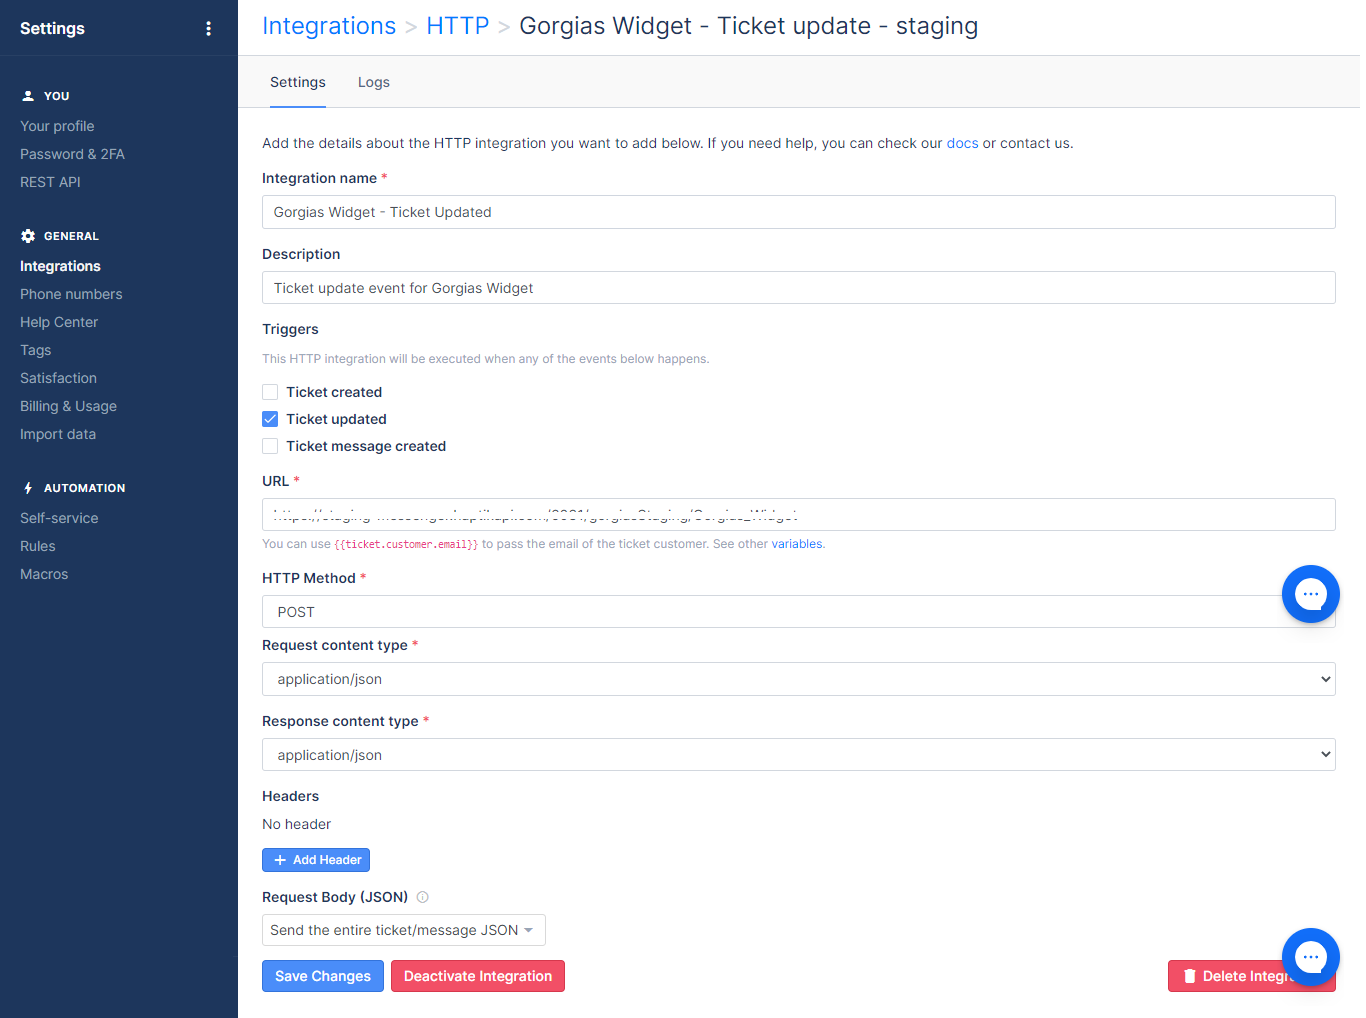
For the webhooks, Ticket Updated, you will have to add the following details in the following fields:
- Integration name: Add a suitable name to your integration.
- Description: Add a description to your integration.
- Triggers: Under the Triggers checklist, select Ticket updated.
- URL: This will be the Callback URL from the Platform Deployments section of your bot, under Gorgias Widget Platform on Haptik.
- HTTP Method: You need to select POST here.
- Request Content Type: Select application/json here.
- Response Content Type: Select application/json here.
- Headers: Keep it as it is, i.e No headers.
- Request Body JSON: You need to select Send the entire ticket/message JSON here.
Once you have added all the necessary details, click on Save Changes button.
After configuring Webhooks, you need to add Haptik IVA as a User.
4. Add Haptik IVA as a User
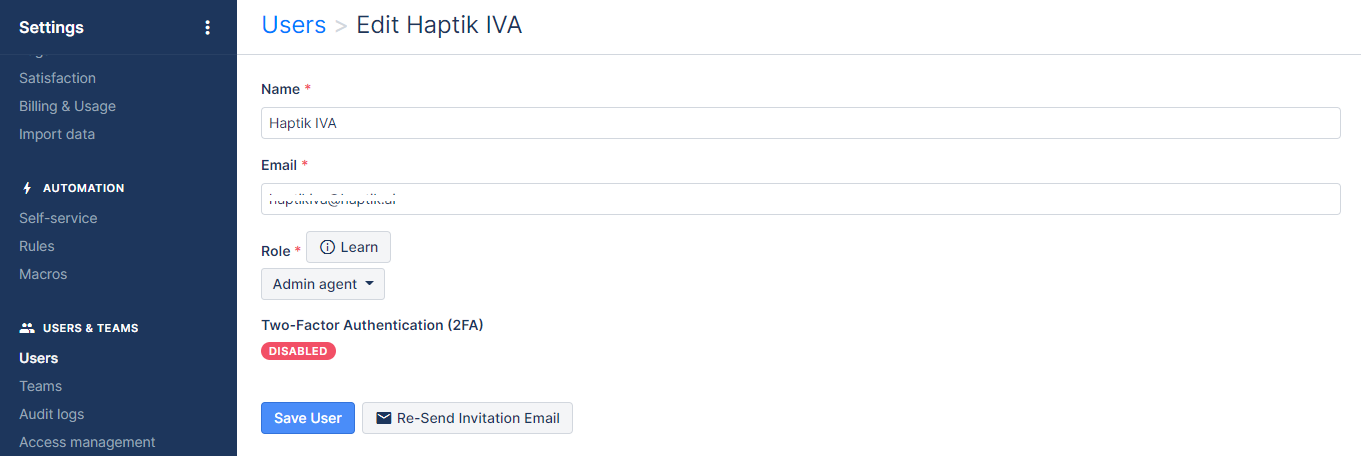
You will have to add Haptik IVA as a User on Gorgias. Navigate to your Gorgias account > USERS & TEAMS > Users, as shown. Here, click on the Add User button, and add Haptik IVA as a User.
5. Add Users(Agents) on Gorgias
You will have to add Users(Agents) on Gorgias, so as to manage the incoming messages from the customers.
Step 1: In order to add users, you need to navigate to your Gorgias account > USERS & TEAMS > Users, as shown. Click on the Add User button, to start adding agents.

Step 2: Next, you will have to add a Name, Email, and you will also have to specify the Role of the User(Agent). You can any one of the following Roles to your user:
- Observer Agent
- Lite Agent
- Basic Agent
- Lead Agent
- Admin Agent

Once you have added all the necessary details, click on the Save User button, after which your agent will be added on Gorgias. Next, you will have to create teams based on the departments you require.
6. Create Teams on Gorgias
You will have to create teams on Gorgias, and add agents to these teams so that there can be proper segregation of work among the agents.
Step 1: In order to create teams, you need to navigate to your Gorgias account > USERS & TEAMS > Teams, as shown. Click on Create Team button to create a new team.

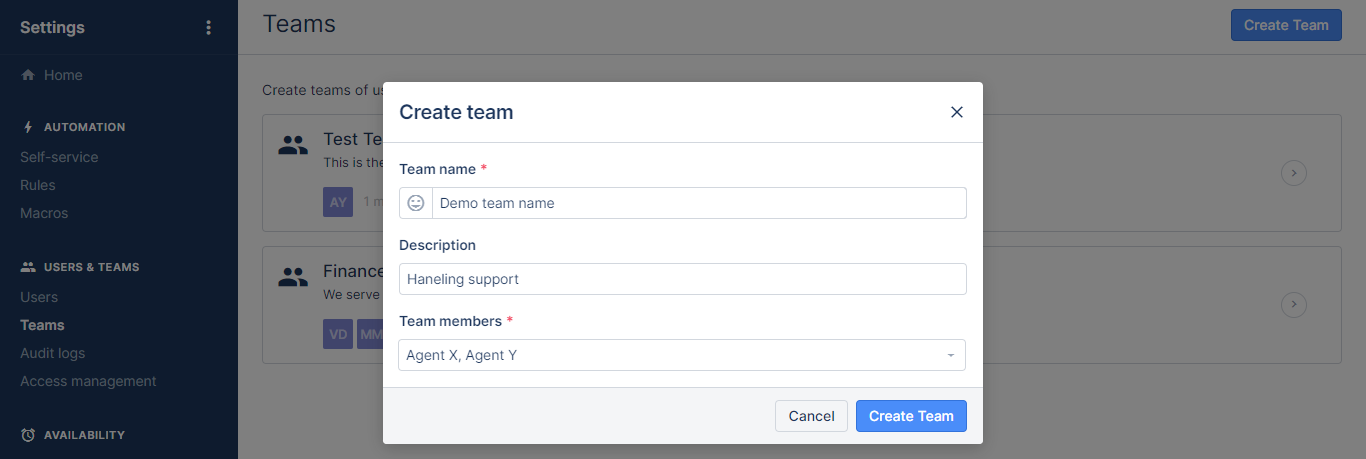
Step 2: After clicking on Create Team, you will see the following pop-up as shown in the image below, where you will have to add a Team name, and description, and you will have to add Team members, who are the agents. These agents need to be added as users first, in order to have them added in the teams.
Step 3: Once you click on the Create Team, you will have to create a Rule based on which the tickets will be handed over to this newly created team.
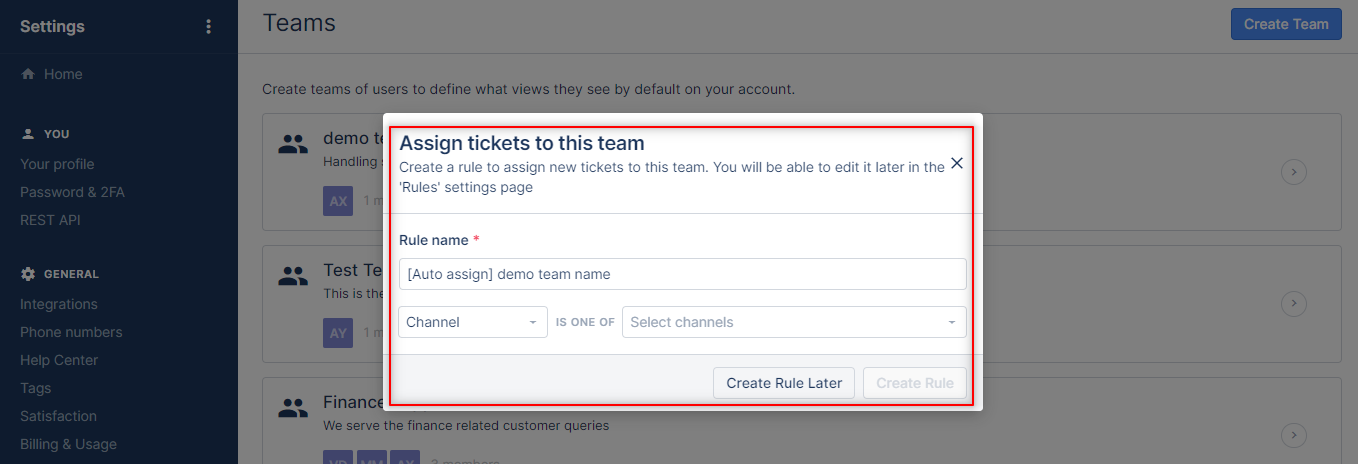
Once you have created a team, you need to have some Rules for these teams, like you saw in the above step. These will be detailed rules based on which the tickets will be assigned to the relevant teams.
7. Set Rules for the incoming tickets
Step 1: In order to set the rules for incoming tickets, navigate to your Gorgias account > Settings > AUTOMATION > Rules, as shown. Click on the Create Rule button.
Step 2: You will have to add all the relevant details based on the Rule you want to create, as that will be the turning point for every ticket that is being handed over to any agent. These Rules are easy to create and are quite self-explanatory. They use IF and THEN structure. We have created one Rule, as shown in the image below. You can create similar rules and implement them.
Once you have created a ticket, you need to switch ON the Enable rule toggle, and then click on the Create Rule button.
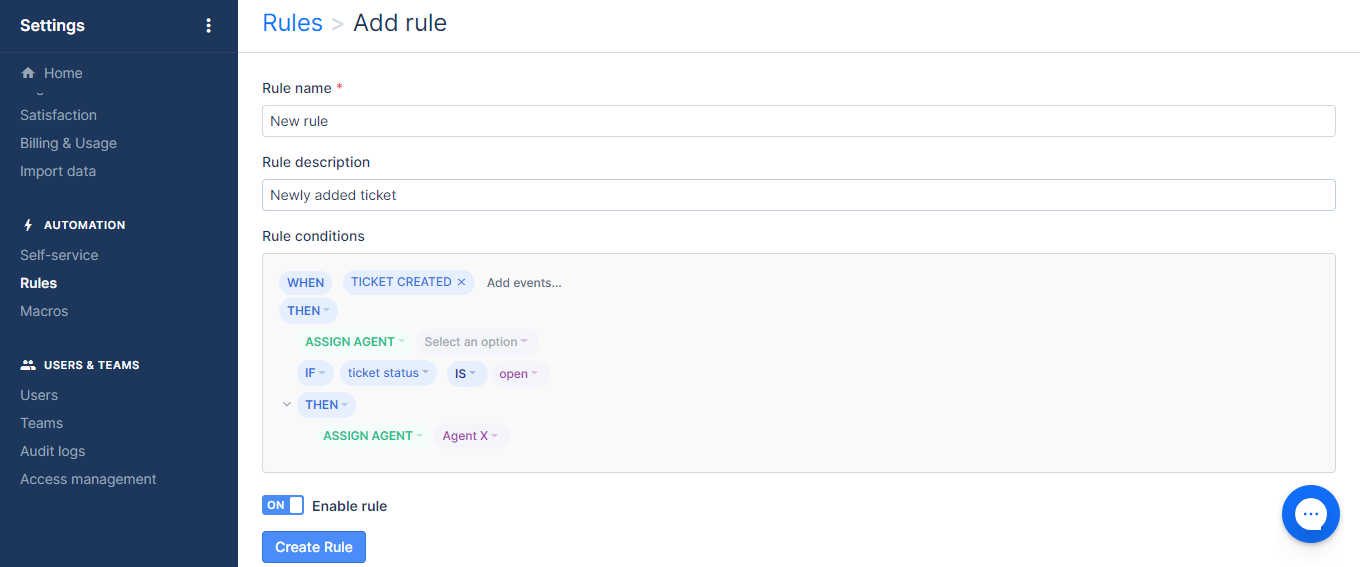
Once you have created a rule/rules, you can move to the next section which is Set Ticket Assignment
8. Set Ticket Assignment
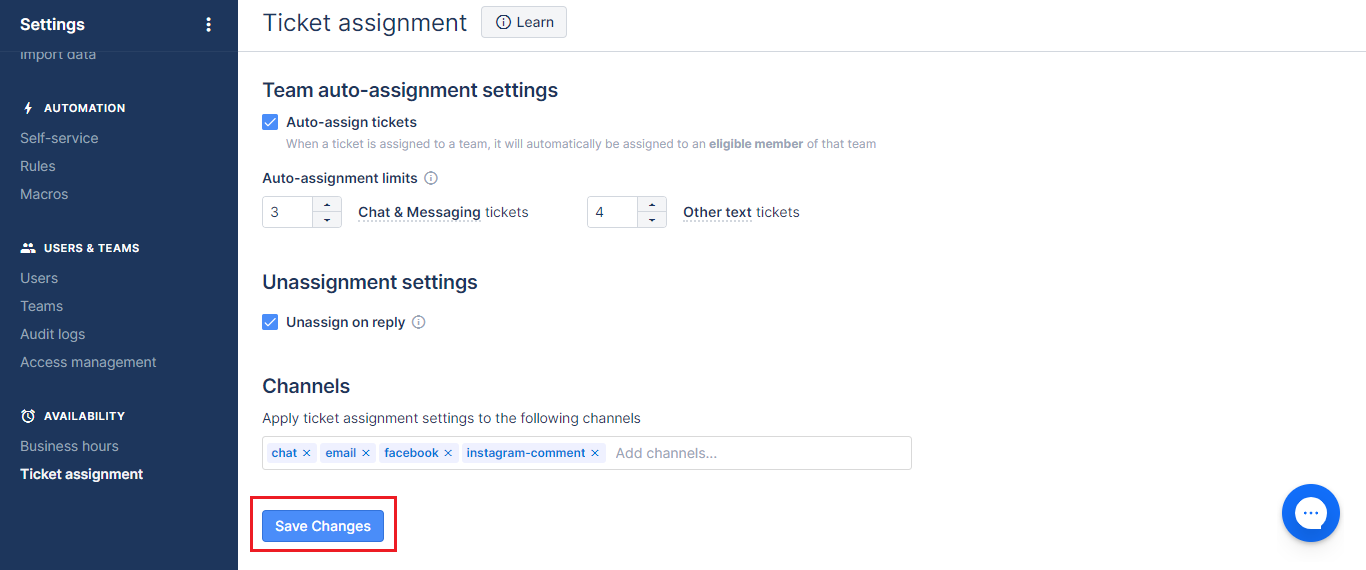
Configuring the Ticket Assignment section is imperative as this will be the deciding factor on how many tickets can be assigned to an agent at a given point in time. You can set the limits of tickets here.
Step 1: In order to set the Ticket Assignment, navigate to your Gorgias account > AVAILABILITY > Ticket Assignment, as shown.
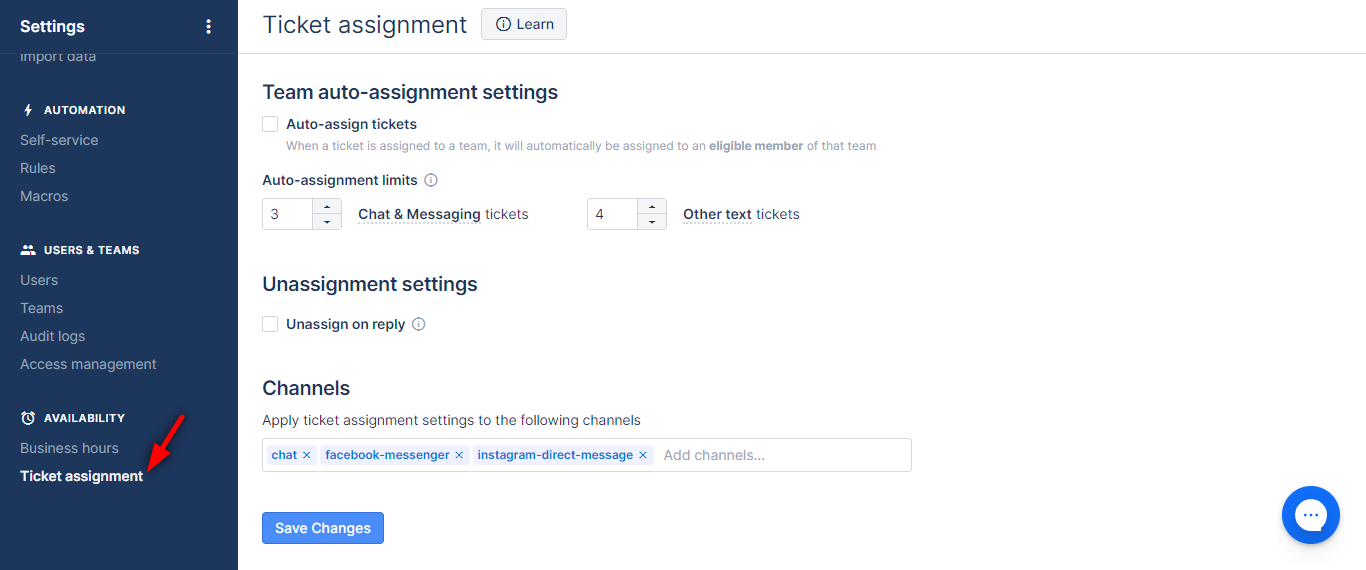
Step 2: Next, you can Auto-assign tickets to agents by ticking on the Auto-assign tickets check box, after which you can set the limit as shown.

Step 3: You can set the Auto-assignment limits for the agents by just adding the number of tickets in the numeric-scroll bar.
An agent is eligible for auto assignment if they are "online" or set to "available" and have fewer open tickets assigned to them than the limits that are defined for them.
You can set these limits for two types of tickets:
- Chat & Messaging tickets: These include Chat, Facebook Messenger, Instagram DM, or any 1-1 instant messaging channels.
- Other text tickets: Includes Email, Facebook and Instagram comments, or any other asynchronous channels. This does not include Phone.

Step 4: Next, you can configure the Unassignment Settings, by ticking the Unassign on reply check box, as shown. This basically unassigns a ticket, if the customer replies but the ticket is assigned to an agent that is "offline" or "unavailable"

Step 5: Once you are done with the above, you can add the Channels, where you want to apply these Ticket-assignment rules.

You just need to click on the text box, and you will see a list of channels. You can then choose the channels as per your requirement, as shown.
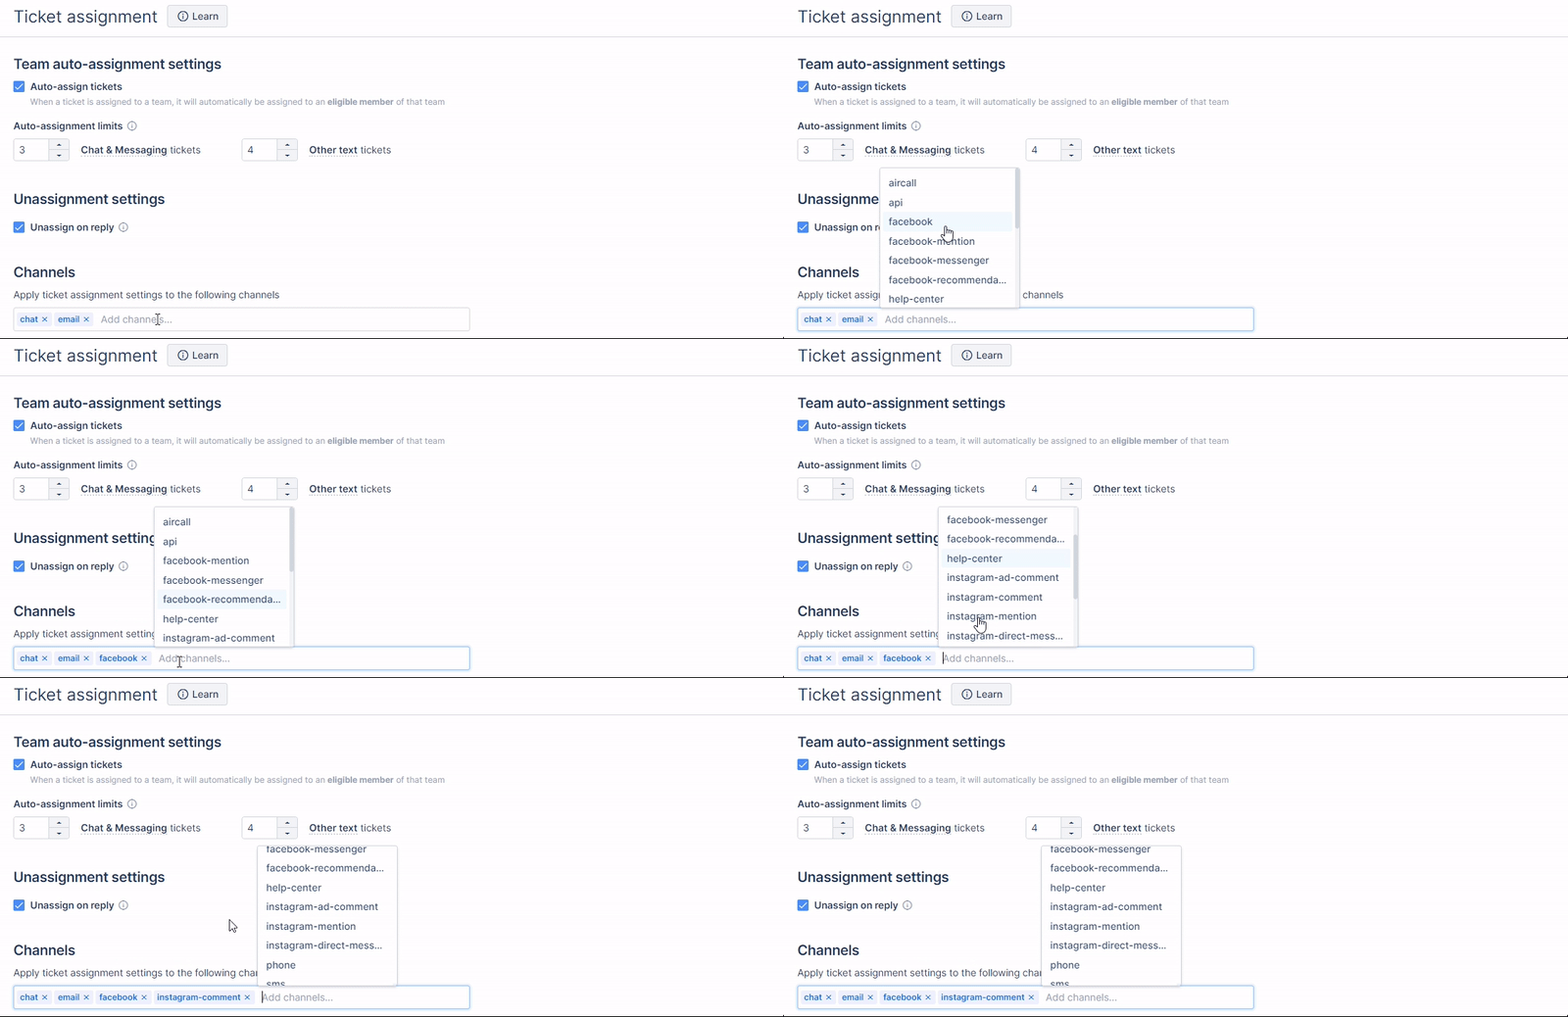
Step 6: Once you have added all the required details, click on the Save Changes button, and you are done.
Here, you are done with setting up all the required functionalities on Gorgias. Now, you can move to the next section, which is Configure Gorgias on Haptik.
9. Configure Gorgias on Haptik
Step 1: In order to configure Gorgias on Haptik, you need to open your Haptik bot, and navigate to Conversation Studio > Business Manager > Channels > Platform Deployments, and under Platform dropdown, select Gorgias Widget, as shown.
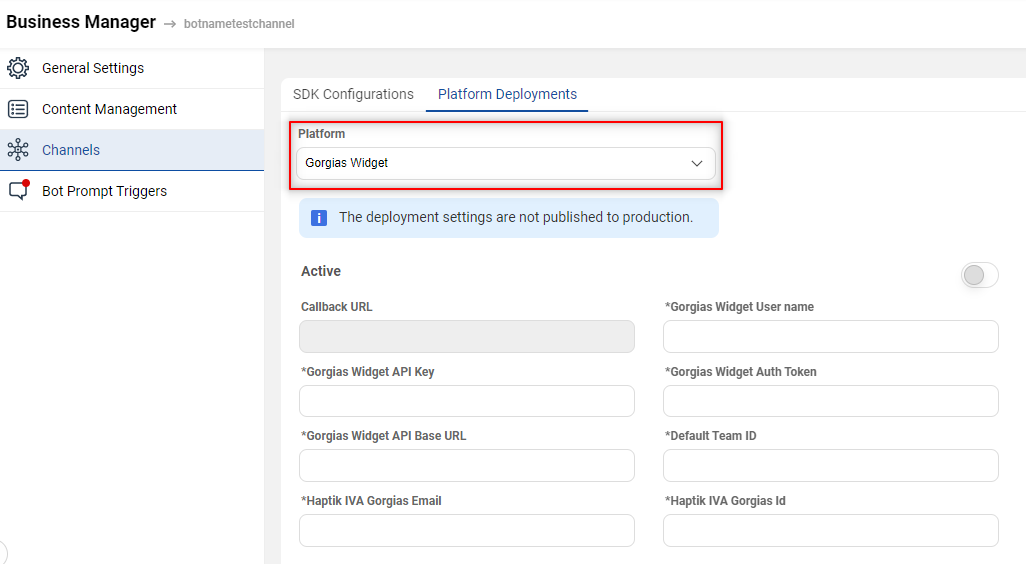
Step 2: After selecting Gorgias Widget, you need to populate the following fields with the relevant information:
-
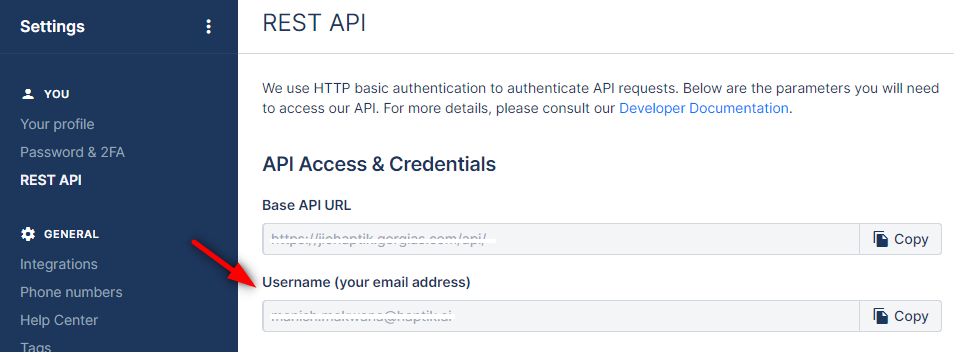
Gorgias Widget User name: For Gorgias Widget User name, navigate to Settings > REST API on Gorgias. The Username(your email address) is the Gorgias Widget User name.
-
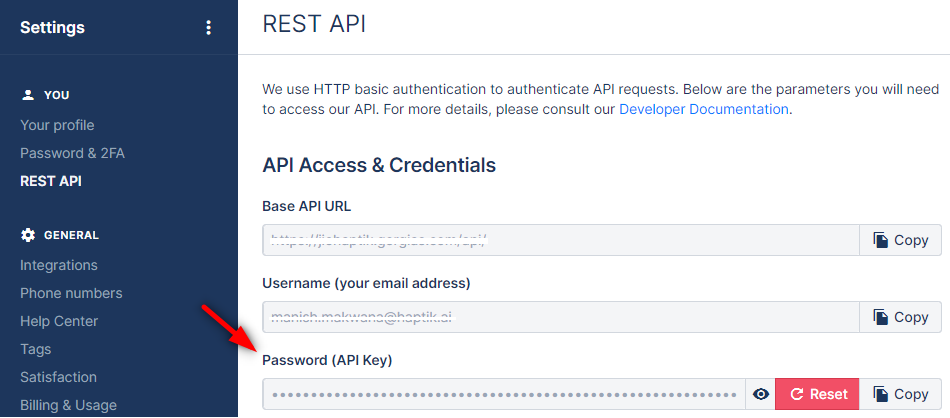
Gorgias Widget API Key: For Gorgias Widget API Key, navigate to Settings >REST API on Gorgias. The Password(API Key) is the Gorgias Widget API Key.
-
Gorgias Widget Auth Token: For Gorgias Widget Auth Token, add a random string value.
-
Gorgias Widget API Base URL: For Gorgias Widget API Base URL, navigate to Settings > REST API on Gorgias. The Base API URL is the Gorgias Widget API Base URL.
Note: The Base API URL is https://test.gorgias.com/api/. Here, you need to use only the https://test.gorgias.com, and omit the /api/
-
Default Team ID: For Default Team ID, navigate to Settings > USERS & TEAMS >Teams on Gorgias, and select a Team. In the URL, you will get the Default Team ID between /teams/ and /members.
The URL will be in the following format -
<base_URL>/app/settings/teams/<Team ID>/members
-
Haptik IVA Gorgias Email: For Haptik IVA Gorgias Email, navigate to Settings > USERS & TEAMS > Users on Gorgias. Select the user, and you will get the Haptik IVA Gorgias Email, as shown.

-
Haptik IVA Gorgias Id: For Haptik IVA Gorgias Id, navigate to Settings > USERS & TEAMS > Users on Gorgias. Select the user, and here you will get the Haptik IVA Gorgias Id in the URL, as shown.
The URL will be in the following format -
<base_URL>/app/settings/users/<User ID>
Once you have followed all the above steps, you are done with the integration, and now you can train and test your bot to check its behavior, and if everything is working as expected.
Congratulations!
