Push notifications on Android SDK
- Getting Started
- Bot Building
- Smart Agent Chat
- Conversation Design
-
Developer Guides
Code Step Integration Static Step Integration Shopify Integration SETU Integration Exotel Integration CIBIL integration Freshdesk KMS Integration PayU Integration Zendesk Guide Integration Twilio Integration Razorpay Integration LeadSquared Integration USU(Unymira) Integration Helo(VivaConnect) Integration Salesforce KMS Integration Stripe Integration PayPal Integration CleverTap Integration Fynd Integration HubSpot Integration Magento Integration WooCommerce Integration Microsoft Dynamics 365 Integration
- Deployment
- External Agent Tool Setup
- Analytics & Reporting
- Notifications
- Commerce Plus
- Troubleshooting Guides
- Release Notes
Push notifications can considerably enhance your customer experience. Haptik SDK can also be configured to receive and handle Push Notifications for the conversation.
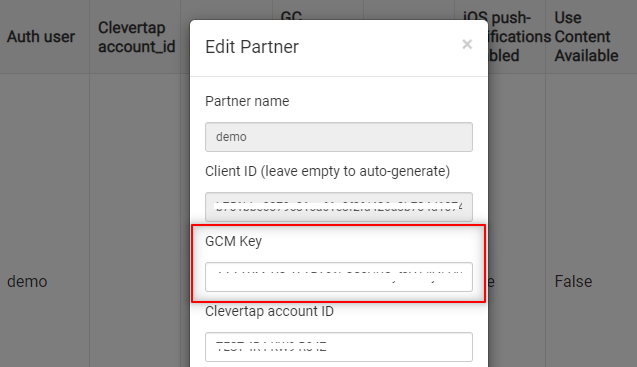
We use Firebase Cloud Messaging for push notifications. Firstly, you will have to update the GCM key in your Partner tool, which is available on the Haptik platform. You can navigate to this tool by logging in to Haptik and the admin tools > partner.

To further enable push notification in HaptikSDK, you have to perform the following three steps :
Add Manifest Entry -
The following Activity needs to be added to your Manifest and add your desired activity as parent activity. This is required so that the user can be navigated to the proper activity when user presses the back button.
<application>
.
.
<activity android:name="ai.haptik.android.wrapper.sdk.HaptikWebView"
          android:parentActivityName=".MainActivity" />
.
.
</application>
Sync Notification Token -
You just need to pass the notification token to Haptik SDK so that the Haptik platform
can trigger push notifications from the backend whenever required.
Forward Notification to Haptik SDK -
Whenever you receive a notification check if it's from the Haptik platform. If it's a Haptik notification forward it to Haptik SDK.
Example:
Kotlin Code:
class MyFirebaseMessagingService : FirebaseMessagingService() {
    override fun onMessageReceived(remoteMessage : RemoteMessage) {
        val data = remoteMessage.data
        // check if it's Haptik notification
        if (HaptikSDK.isHaptikNotification(data)) {
            HaptikSDK.handleNotification(
                applicationContext,
                data,
                // Icon to show in notification
                R.mipmap.ic_launcher_round
            )
        }
    }
    override fun onNewToken(token: String) {
        super.onNewToken(token)
        HaptikSDK.setNotificationToken(applicationContext, token)
    }
}
Java Code:
public class MyFirebaseInstanceMessagingService extends FirebaseMessagingService {
   @Override
   public void onMessageReceived(@NonNull RemoteMessage message) {
       super.onMessageReceived(message);
       Map<String, String> data = message.getData();
       if(HaptikSDK.INSTANCE.isHaptikNotification(data)){
           HaptikSDK.INSTANCE.handleNotification(this, data, R.mipmap.ic_launcher);
       }
   }


   @Override
   public void onNewToken(@NonNull String token) {
       super.onNewToken(token);
       HaptikSDK.INSTANCE.setNotificationToken(getApplicationContext(), token);
   }
}
Initialise Haptik SDK
To handle the case where user taps on notification and the app was in killed state, we must initialised Haptik SDK. For this use the Application class to initialise Haptik SDK.
Code:
class App : Application(), SignupDataCallback {
    override fun onCreate() {
        super.onCreate()
        // Step 1: You must initialise Haptik SDK
        val initData = InitData()
        HaptikSDK.init(applicationContext, initData)
    }

    // Step 2(Optional): If you're using custom signup. You need to implement this method which we'll call while opening up SDK.
    // This method is defined in SignupDataCallback interface
    override fun signupData(): SignupData {
        return SignupData().apply {
            authCode = "AUTH_CODE"
            authId = "USER_AUTH_ID"
            signupType = "SIGNUP_TYPE"
        }
    }
}