What is Zendesk Chat Integration? How to set up Haptik and Zendesk Chat Integration?
- Getting Started
- Bot Building
- Smart Agent Chat
- Conversation Design
-
Developer Guides
Code Step Integration Static Step Integration Shopify Integration SETU Integration Exotel Integration CIBIL integration Freshdesk KMS Integration PayU Integration Zendesk Guide Integration Twilio Integration Razorpay Integration LeadSquared Integration USU(Unymira) Integration Helo(VivaConnect) Integration Salesforce KMS Integration Stripe Integration PayPal Integration CleverTap Integration Fynd Integration HubSpot Integration Magento Integration WooCommerce Integration Microsoft Dynamics 365 Integration
- Deployment
- External Agent Tool Setup
- Analytics & Reporting
- Notifications
- Commerce Plus
- Troubleshooting Guides
- Release Notes
Table of Contents
Table of Contents
Prerequisites for having a bot with Zendesk Chat integrationHow to set up Zendesk Chat + Haptik Integration?1. Adding Agents on Zendesk Chat2. Configuring Haptik Bot as an agent3. Adding details in the Configure ZendeskLiveChat section on Haptik4. Completing OAuth Flow5. Configuring Chat with an Agent on the Haptik bot6. Starting WebSocket ConnectionZendesk is a service-first CRM company that builds software designed to improve customer relationships. The software is powerful and flexible and scales to meet the needs of any business.
The Zendesk Messaging Bot Partner Program is a new initiative at Zendesk to help businesses deliver bot integrations into Zendesk Suite.
Leveraging Zendesk Integration will allow you to provide finer customer service using Zendesk UI backed by the power of Haptik chatbot. Using Haptik, you can build AI-powered user journeys which help your users to get their queries resolved faster. To know more about the features of Zendesk chat, click here.
You can check the UI elements supported by Zendesk Chat, here.
Prerequisites for having a bot with Zendesk Chat integration
Following are the prerequisites:
- A bot on Haptik. You can read this article to build your own bot.
- A registered account on Zendesk, with a Zendesk Enterprise license. You can check the pricing, here.
How to set up Zendesk Chat + Haptik Integration?
The steps for Setup are divided into different sections.
- Adding Agents on Zendesk Chat.
- Configuring Haptik Bot as an agent.
- Adding details in the Configure ZendeskLiveChat section on Haptik.
- Completing OAuth Flow.
- Configuring Chat with an Agent on the Haptik bot.
- Starting WebSocket Connection.
1. Adding Agents on Zendesk Chat
Once you have registered on Zendesk, you will have to add users to it. These users are nothing but agents.
Step 1: Navigate to Zendesk Support, and click on the +Add button in the top left corner of the screen, to create a new User.

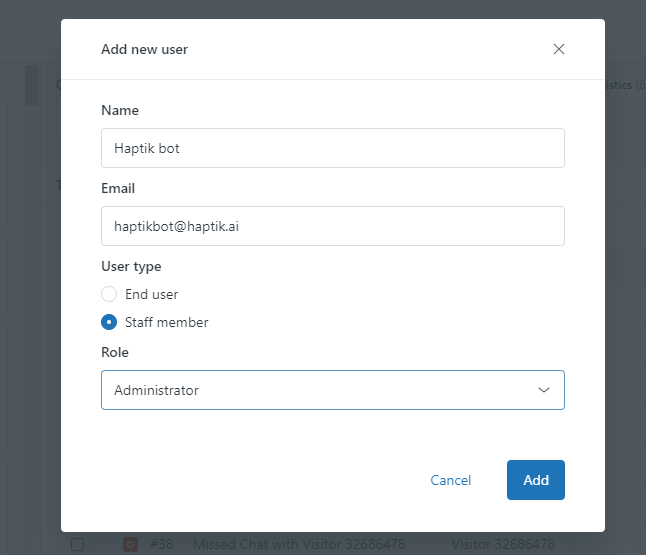
Step 2: Next, you will have to provide a Name, Email, and Role, for your User in the pop-up that appears, as shown.
Step 3: You can check the created users by navigating to the Team Members section. Select Admin Center from the Zendesk Products button (located beside the Profile icon, top-right of the screen. Select People > Team Members, as shown.
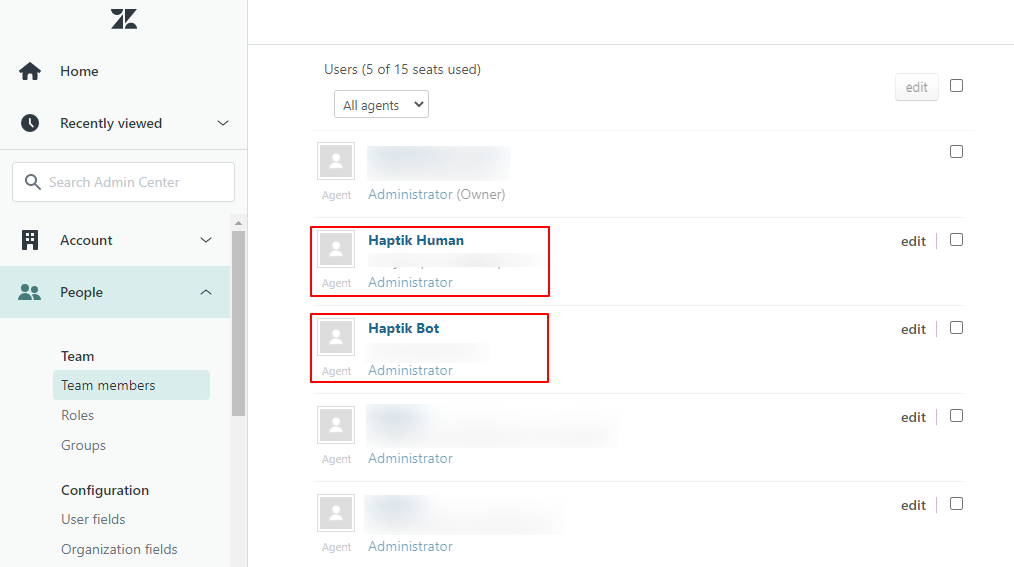
As shown in the above image, we have 2 agents here, Haptik Human and Haptik Bot. Haptik Bot is the agent for which you will carry out the steps mentioned in the following section.
2. Configuring Haptik Bot as an agent
Configuring the "Haptik Bot" is an important step. Here, the Haptik bot is an agent, that will respond to the users' queries when the user starts a conversation on your bot, prior to connecting with a live agent. The Haptik bot(agent) is connected to the Haptik bot(IVA).
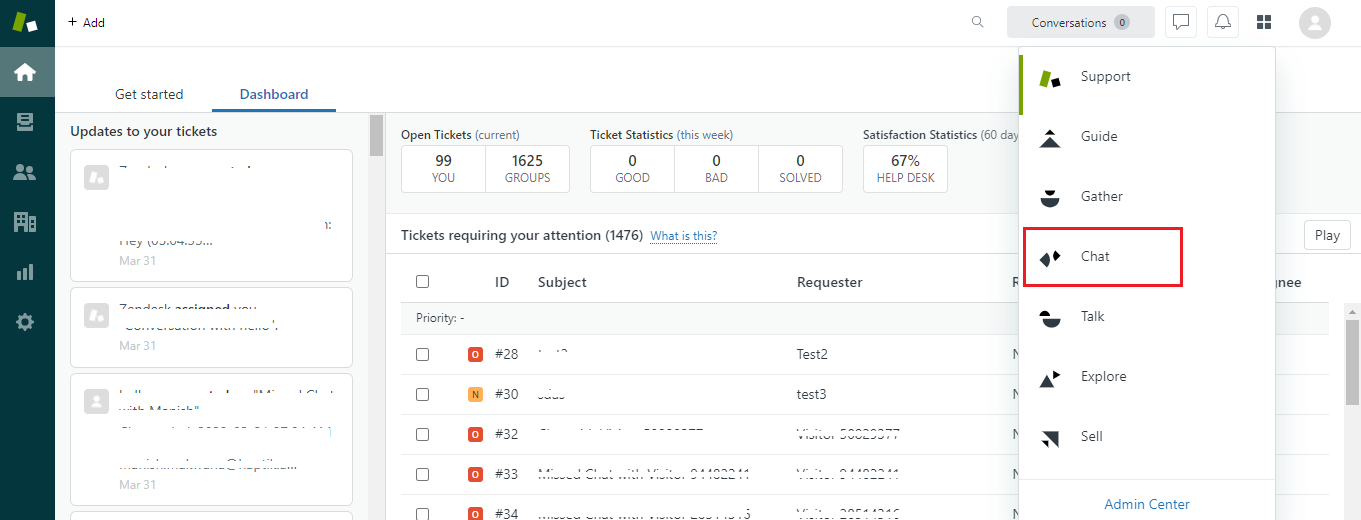
Step 1: Currently, you are on the Support screen, so navigate to Chat, from the Zendesk Products option, as shown.
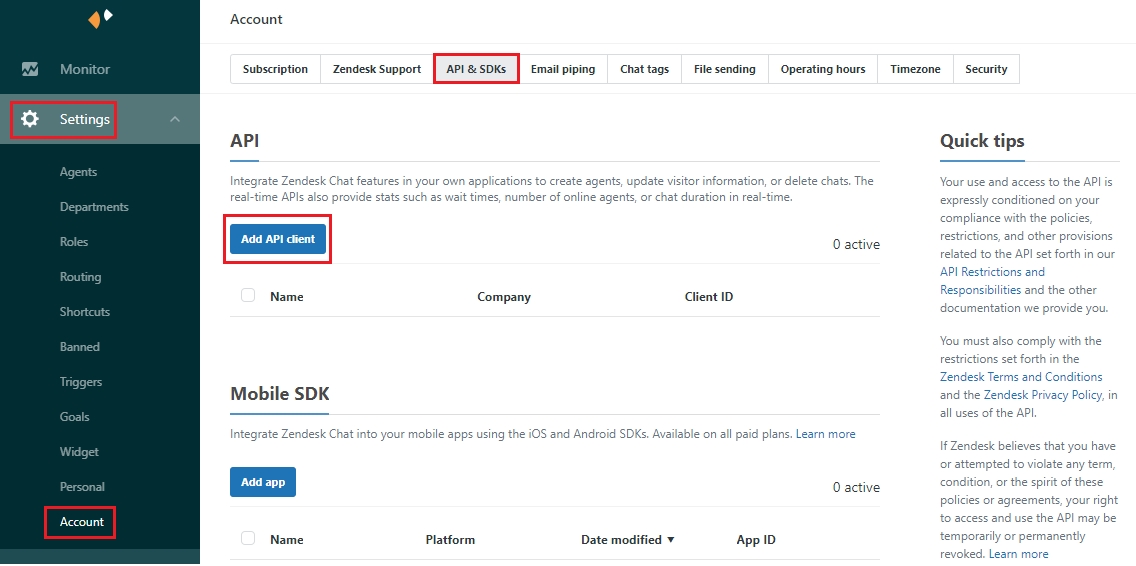
Step 2: Navigate to Settings > Account > API & SDKs, and select Add API Client.
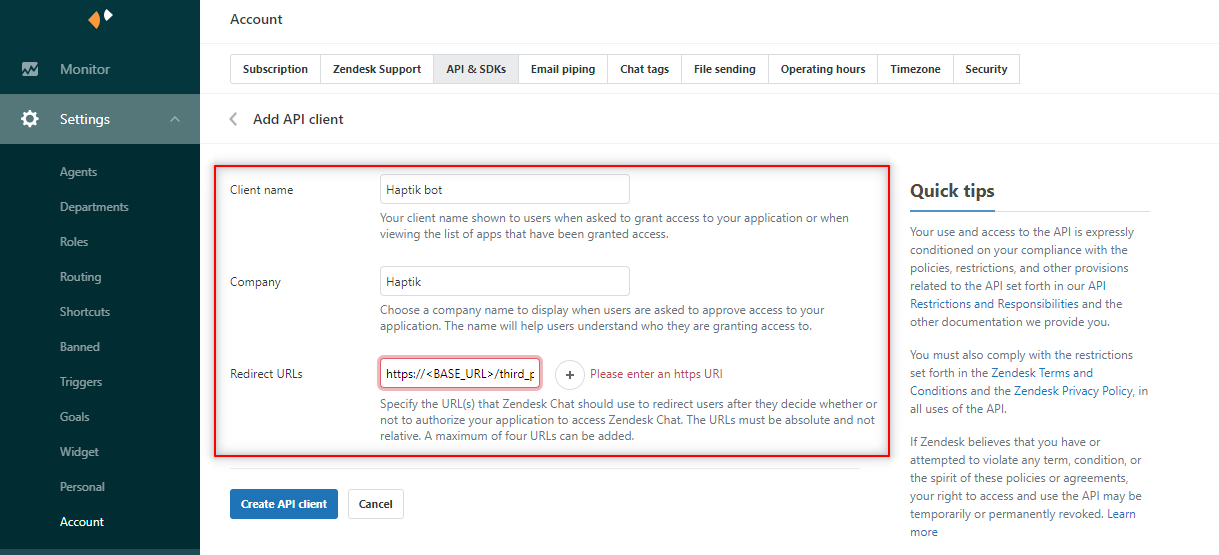
Step 3: Here, you will have to provide the following details -
- Client Name: Haptik bot(Example)
- Company Name: Haptik(Example)
- Redirect URLs: Provide the following link - https://<base_URL>/third_party_integrations/v1/zendesk_live_chat/generate_token/<business_ID>
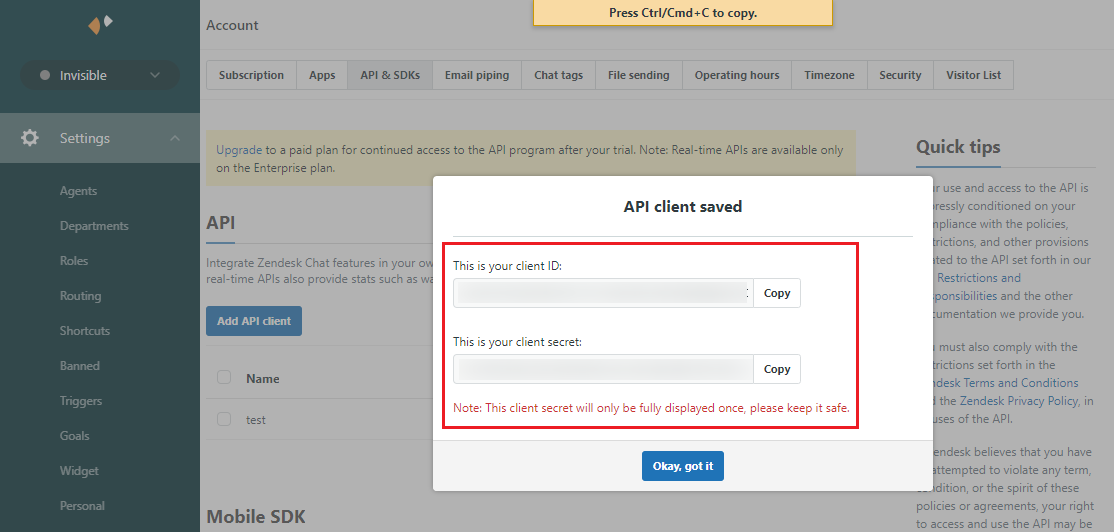
Step 4: Once the API Client is added, a pop-up will appear on your screen with the Client ID, and Client Secret. You need to copy the keys, and store them as these keys will be displayed only once.
Here, the configuration of the Haptik bot(agent) ends, and you can now move to the next section which is Adding details in the Configure ZendeskLiveChat section on Haptik.
3. Adding details in the Configure ZendeskLiveChat section on Haptik
Step 1: Now, as you have your bot ready on Haptik, navigate to Agent Escalation > ZendeskLiveChat, as shown.
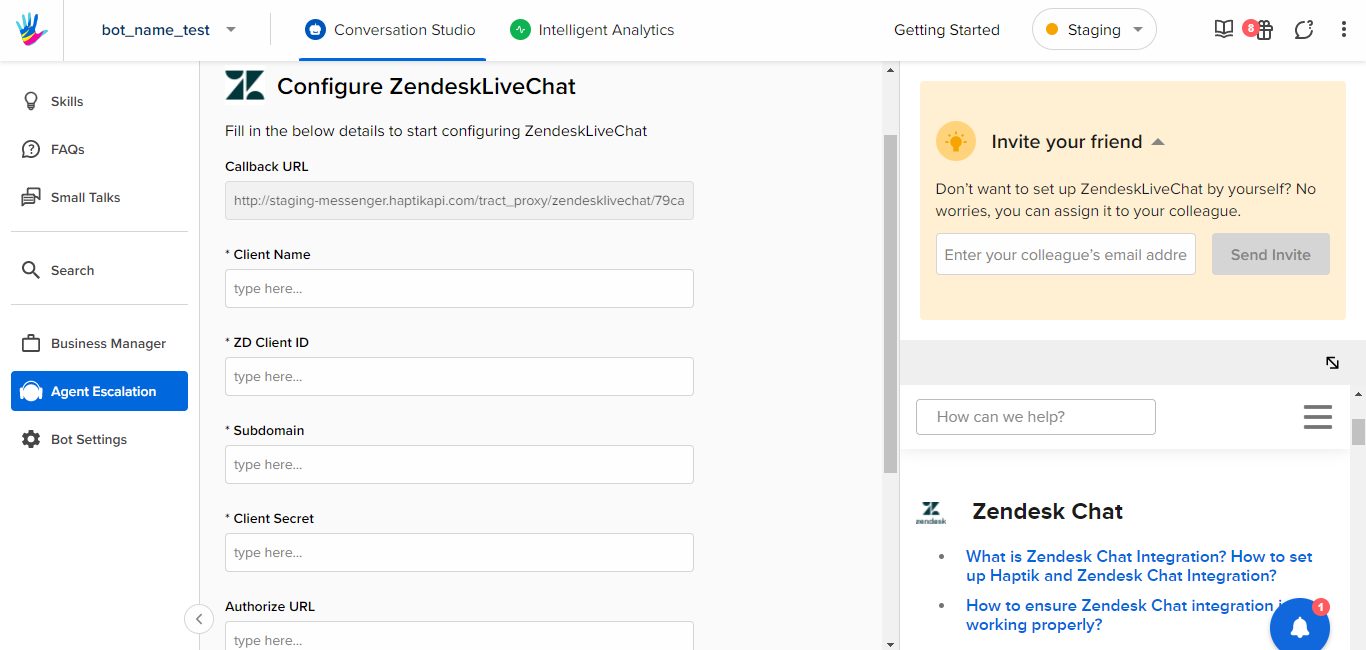
Step 2: Here, you will have to populate the following mandatory fields -
- Client Name: This is the Client Name provided in Step 3 of Section 2(Configuring Haptik Bot as an agent).
- ZD Client ID: This is the Client ID from the Zendesk API Client, generated in Step 4 of Section 2(Configuring Haptik Bot as an agent).
-
Subdomain: This will be the Zendesk Subdomain. The Zendesk team will provide a domain name at the time of signing up on Zendesk. (If you have not received the domain name, then use your business's domain name, followed by zendesk.com)
Example: If this value is Haptik, the URL will be https://haptik.zendesk.com/ - Client Secret: This is the Client Secret from the Zendesk API Client, generated in Step 4 of Section 2(Configuring Haptik Bot as an agent).
- Authorize URL: This field is Auto-generated.
- Agent Offline Message: You will have to enter a string here, that will be sent to the user every time they request to chat with an agent when the agent is offline.
At this stage, we are done with adding
4. Completing OAuth Flow
Once you have done all the setup required on the Zendesk dashboard, as well as on the Haptik dashboard, you need to complete the OAuth flow in order to connect those two setups with each other, which will enable your integration to work properly.
Step 1: In order to complete the OAuth flow, you will have to open the Authorize URL in the browser. This is the URL that was generated in Step 2 of Section 3 (Adding details in the Configure ZendeskLiveChat section on Haptik).
The URL would resemble this format -
https://<md-base-url>/third_party_integrations/v1/zendesk_live_chat/generate_authorize_url/<businessId>
Step 2: After opening this Authorize URL, you will be able to see a JSON on your screen. To view it in a structured way, you can use a JSON parser.
Here, you will receive these details, as shown.

Step 3: You will have to copy the new authorize_url, that you received in the previous step. Open this URL, and this will take you to the Authentication screen, as shown. Here, you will have to click on the Allow option.

Step 4: After clicking on Allow, you will be redirected to an empty screen, which means the OAuth flow has been completed successfully.
Once the OAuth flow has been completed, you can move to the next section which is Configuring Chat with an Agent on Haptik.
5. Configuring Chat with an Agent on the Haptik bot
You need to configure the Code Step in your bot, which will enable the transfer of the chat from the bot to an agent when the user requests to chat with an agent.
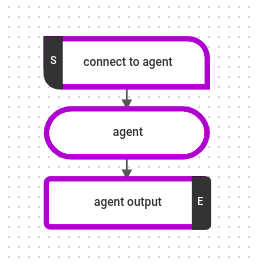
Step 1: Here, along with the user journeys you have built on your bot, you will have to create a Static Step, and connect it to a Code Step, as shown.
Step 2: Copy and paste the below code in the Code step.
import json
import requests
import traceback

def main(event, context):
    body = json.loads(event['body'])
    entities = body.get('entities')
    conversation_details = body.get('conversation_details')
    user_data = body.get('user')
    env_variables = body.get('env_variables')
    pre_chat_details = body.get('user_details')

    final_response = {}
    print("body---->", body)

    headers = {
        'Authorization': 'Bearer <Bot_api_token>',
        'Content-Type': 'application/json',
        'client-id': <Account_id>
    }

    print("headers--->", headers)
    data = {
        "auth_id": user_data.get('auth_id'),
        "source": "zendesk_chat",
        "user_details": {
            "trasfer_default_department": False,
            "agent_offline_message": "😥 Sorry, there are no agents available right now. Please try again later.",
            "department_name": pre_chat_details.get('current_department_name')
        }
    }
    print("data--->", data)
    try:
        api_response = requests.post(<MD_endpoint>+ '/third_party_integrations/v1/zendesk_live_chat/cache_user_details/', headers=headers, data=json.dumps(data))
        print("api_response---->", api_response.text)
        if api_response.status_code == 200:
            final_response.update({
                'status': True
            })
        else:
            final_response.update({
                'status': False
            })
    except Exception as err:
        traceback.print_exc()
        final_response.update({
            'status': False
        })

    response = {'statusCode': 200, 'body': json.dumps(final_response), 'headers': {'Content-Type': 'application/json'}}
    return response
Step 3: In the above code, you are required to add data in the following three fields -
- Bot_api_token
- Account_id
- MD_endpoint
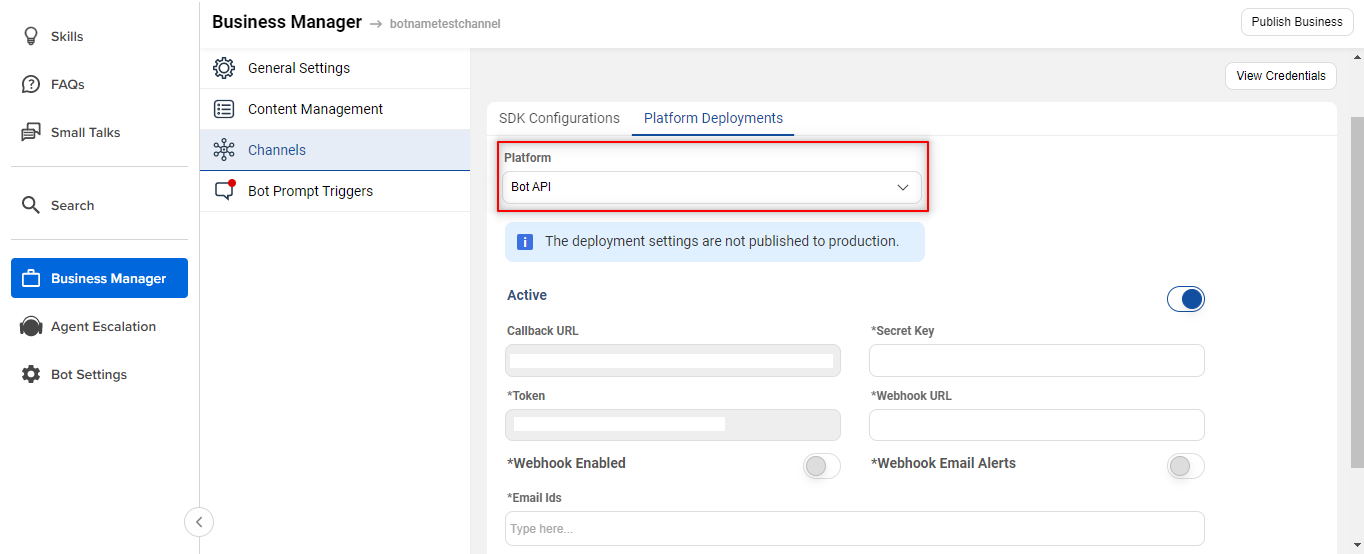
Step 4: To acquire the data for each of the above, you need to open your bot, navigate to Business Manager > channels > Platform Deployments, and add Bot API, in the Platform dropdown, as shown.
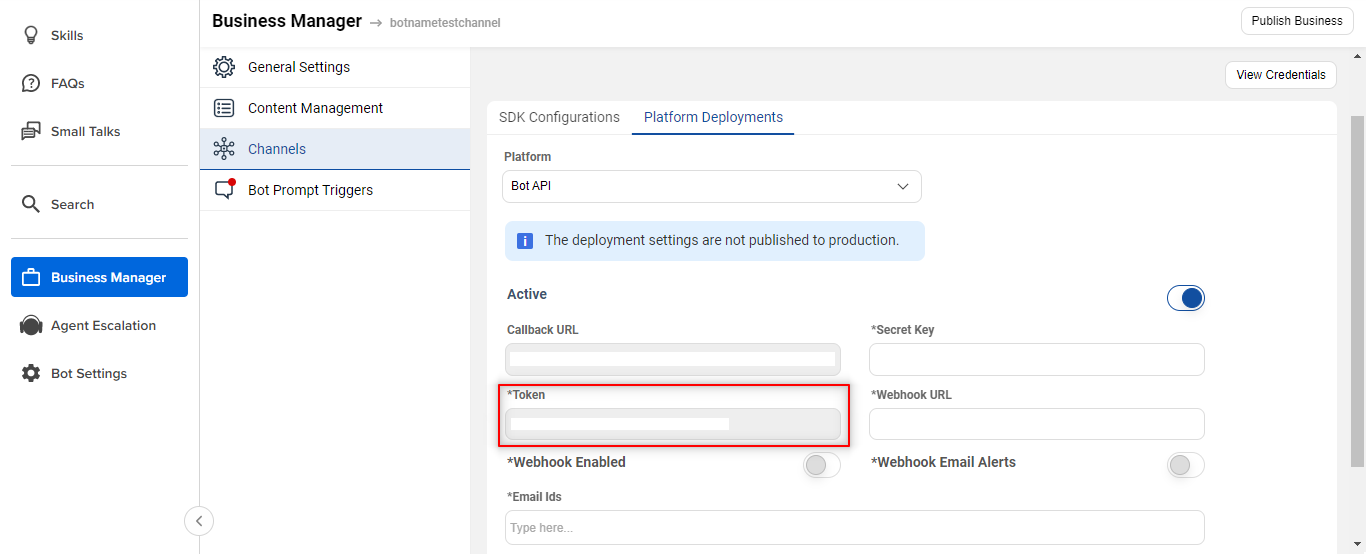
Step 5: Once you have added Bot API as a platform, you will get the Bot_api_token from the Token field, as shown.
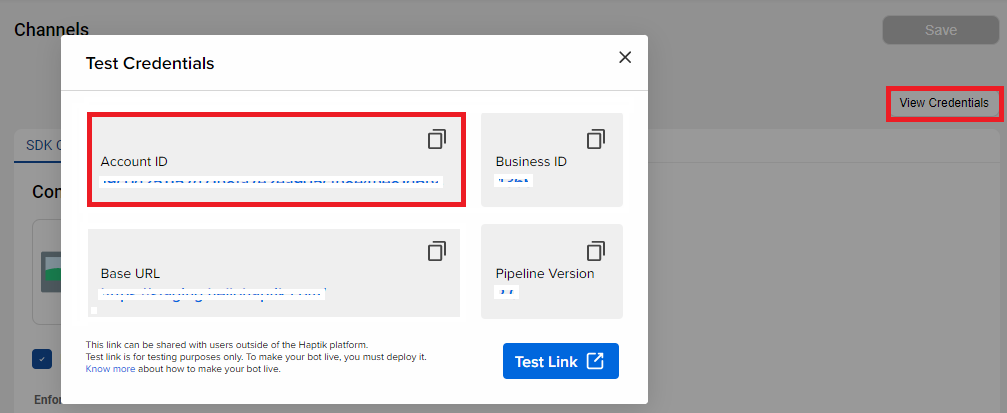
Step 6: For Account_id, click on the View Credentials button, and a pop-up will appear on the screen, from where you can copy the same.
Step 7: For MD_endpoint, contact your Haptik SPOC.
Once you are done adding all these details to your code, you can save it, after which you can train your bot with all the updates made to it. Next, you need to start the Websocket Connection, which is explained in the following section.
6. Starting WebSocket Connection
When all the above steps are done, you need to test your bot. In order to test your bot, you will require a simulator link for testing it. With this step, you will be able to generate the simulator link, which can be used for testing your bot.
Step 1: Navigate to Zendesk Chat, and select Visitors, as shown.

Step 2: Next, you need to click on the Simulate Chat button, on the screen, as shown in the above image. After clicking the Simulate Chat button, a new page will open up with your bot, as shown.
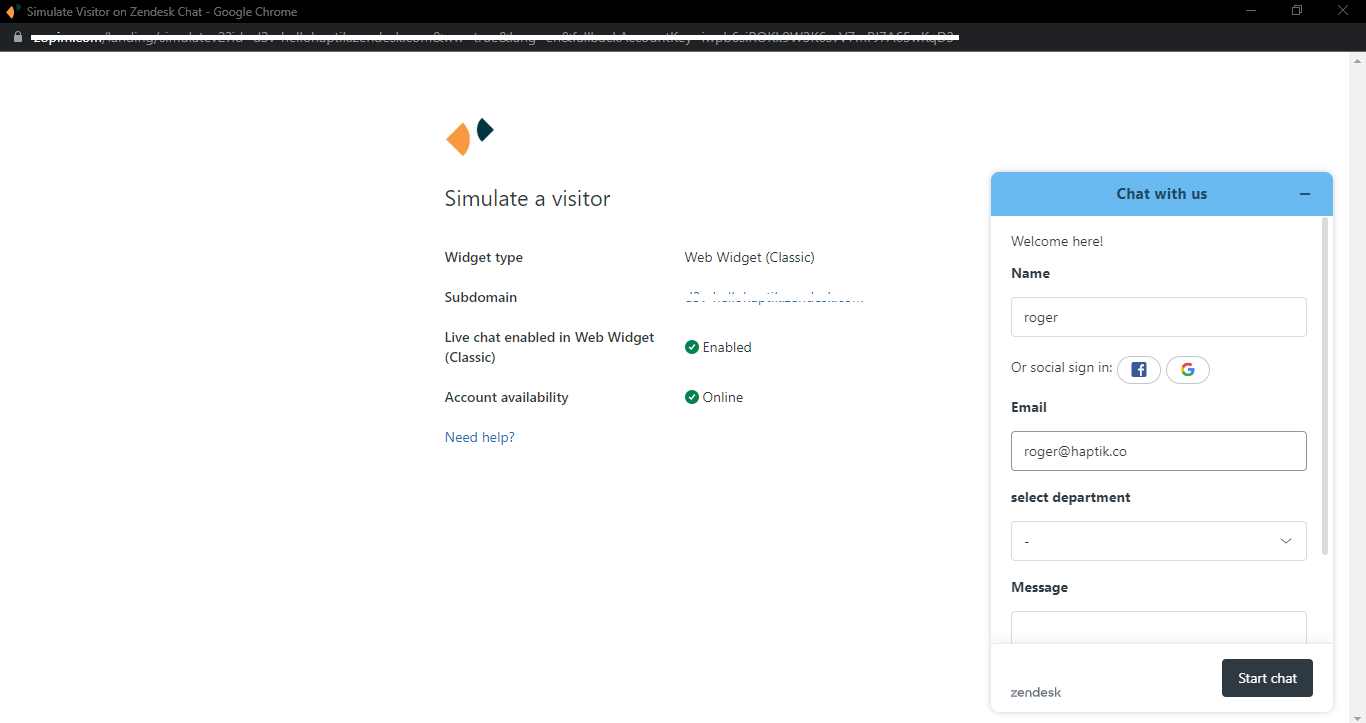
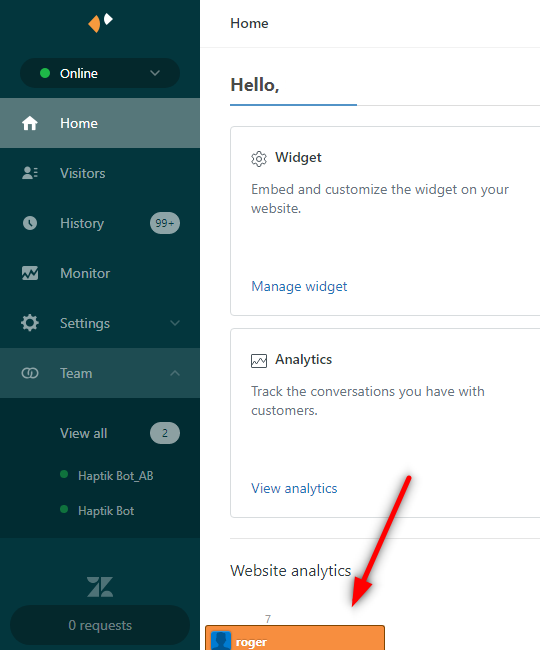
Step 3: You can now test your bot here. When you request to chat with an agent, the chat will be transferred to an agent, which means it will be transferred to the agent dashboard, where you will receive a notification for accepting the chat, as shown. Once you have accepted the chat, you can test your integration easily.
You can check this article, which will give you an understanding of how this integration actually works when a user requests to chat with an agent.

